• About
  • Contact
  • Orders / Pedidos
  • Press

One Day Café

~ good eats from a small kitchen

One Day Café

Category Archives: recipes

Recipe: Prosciutto-Wrapped Jalapeño Poppers

08 Tuesday Oct 2013

Posted by Anonymous in appetizers and sides, recipes

≈ 2 Comments

Tags

appetizer, bacon, cream cheese, food, grilling, jalapeño poppers, prosciutto, spicy, summer

Grilled Jalapeño Poppers

Summer may be officially over, but Indian summer was in full effect this past week. Let’s embrace these last few 80-degree days by squeezing in a few more grilling sessions, shall we?

I’ve long been a fan of jalapeño poppers of the breaded, deep-fried, so-bad-for-you-they’re-good variety. I like to tell myself these are slightly less artery-clogging.

Grilled jalapeño poppers were first introduced to me at a friend’s backyard barbecue in Philadelphia eight years ago. Sheer genius! They promptly joined my regular rotation of summer staples. We originally wrapped them with bacon, but in Argentina the availability of American bacon cut thinner than 1/4 inch was slim to none, and no one likes a popper wrapped in raw pork fat. So instead we started using jamón crudo, and it was a huge win. It’s leaner and crisps faster, with no worries about it cooking the whole way through. We haven’t looked back since.

Jalapeño Poppers

I figured grilling up some poppers would also be a good way to use the bounty of jalapeños I got from my balcony garden. And by “bounty” I mean…two. Thankfully, the local producers supplying the Fort Greene farmers market seem to be a bit more successful at pepper-growing than me.

This year's crop in its entirety. So sad, so sad.

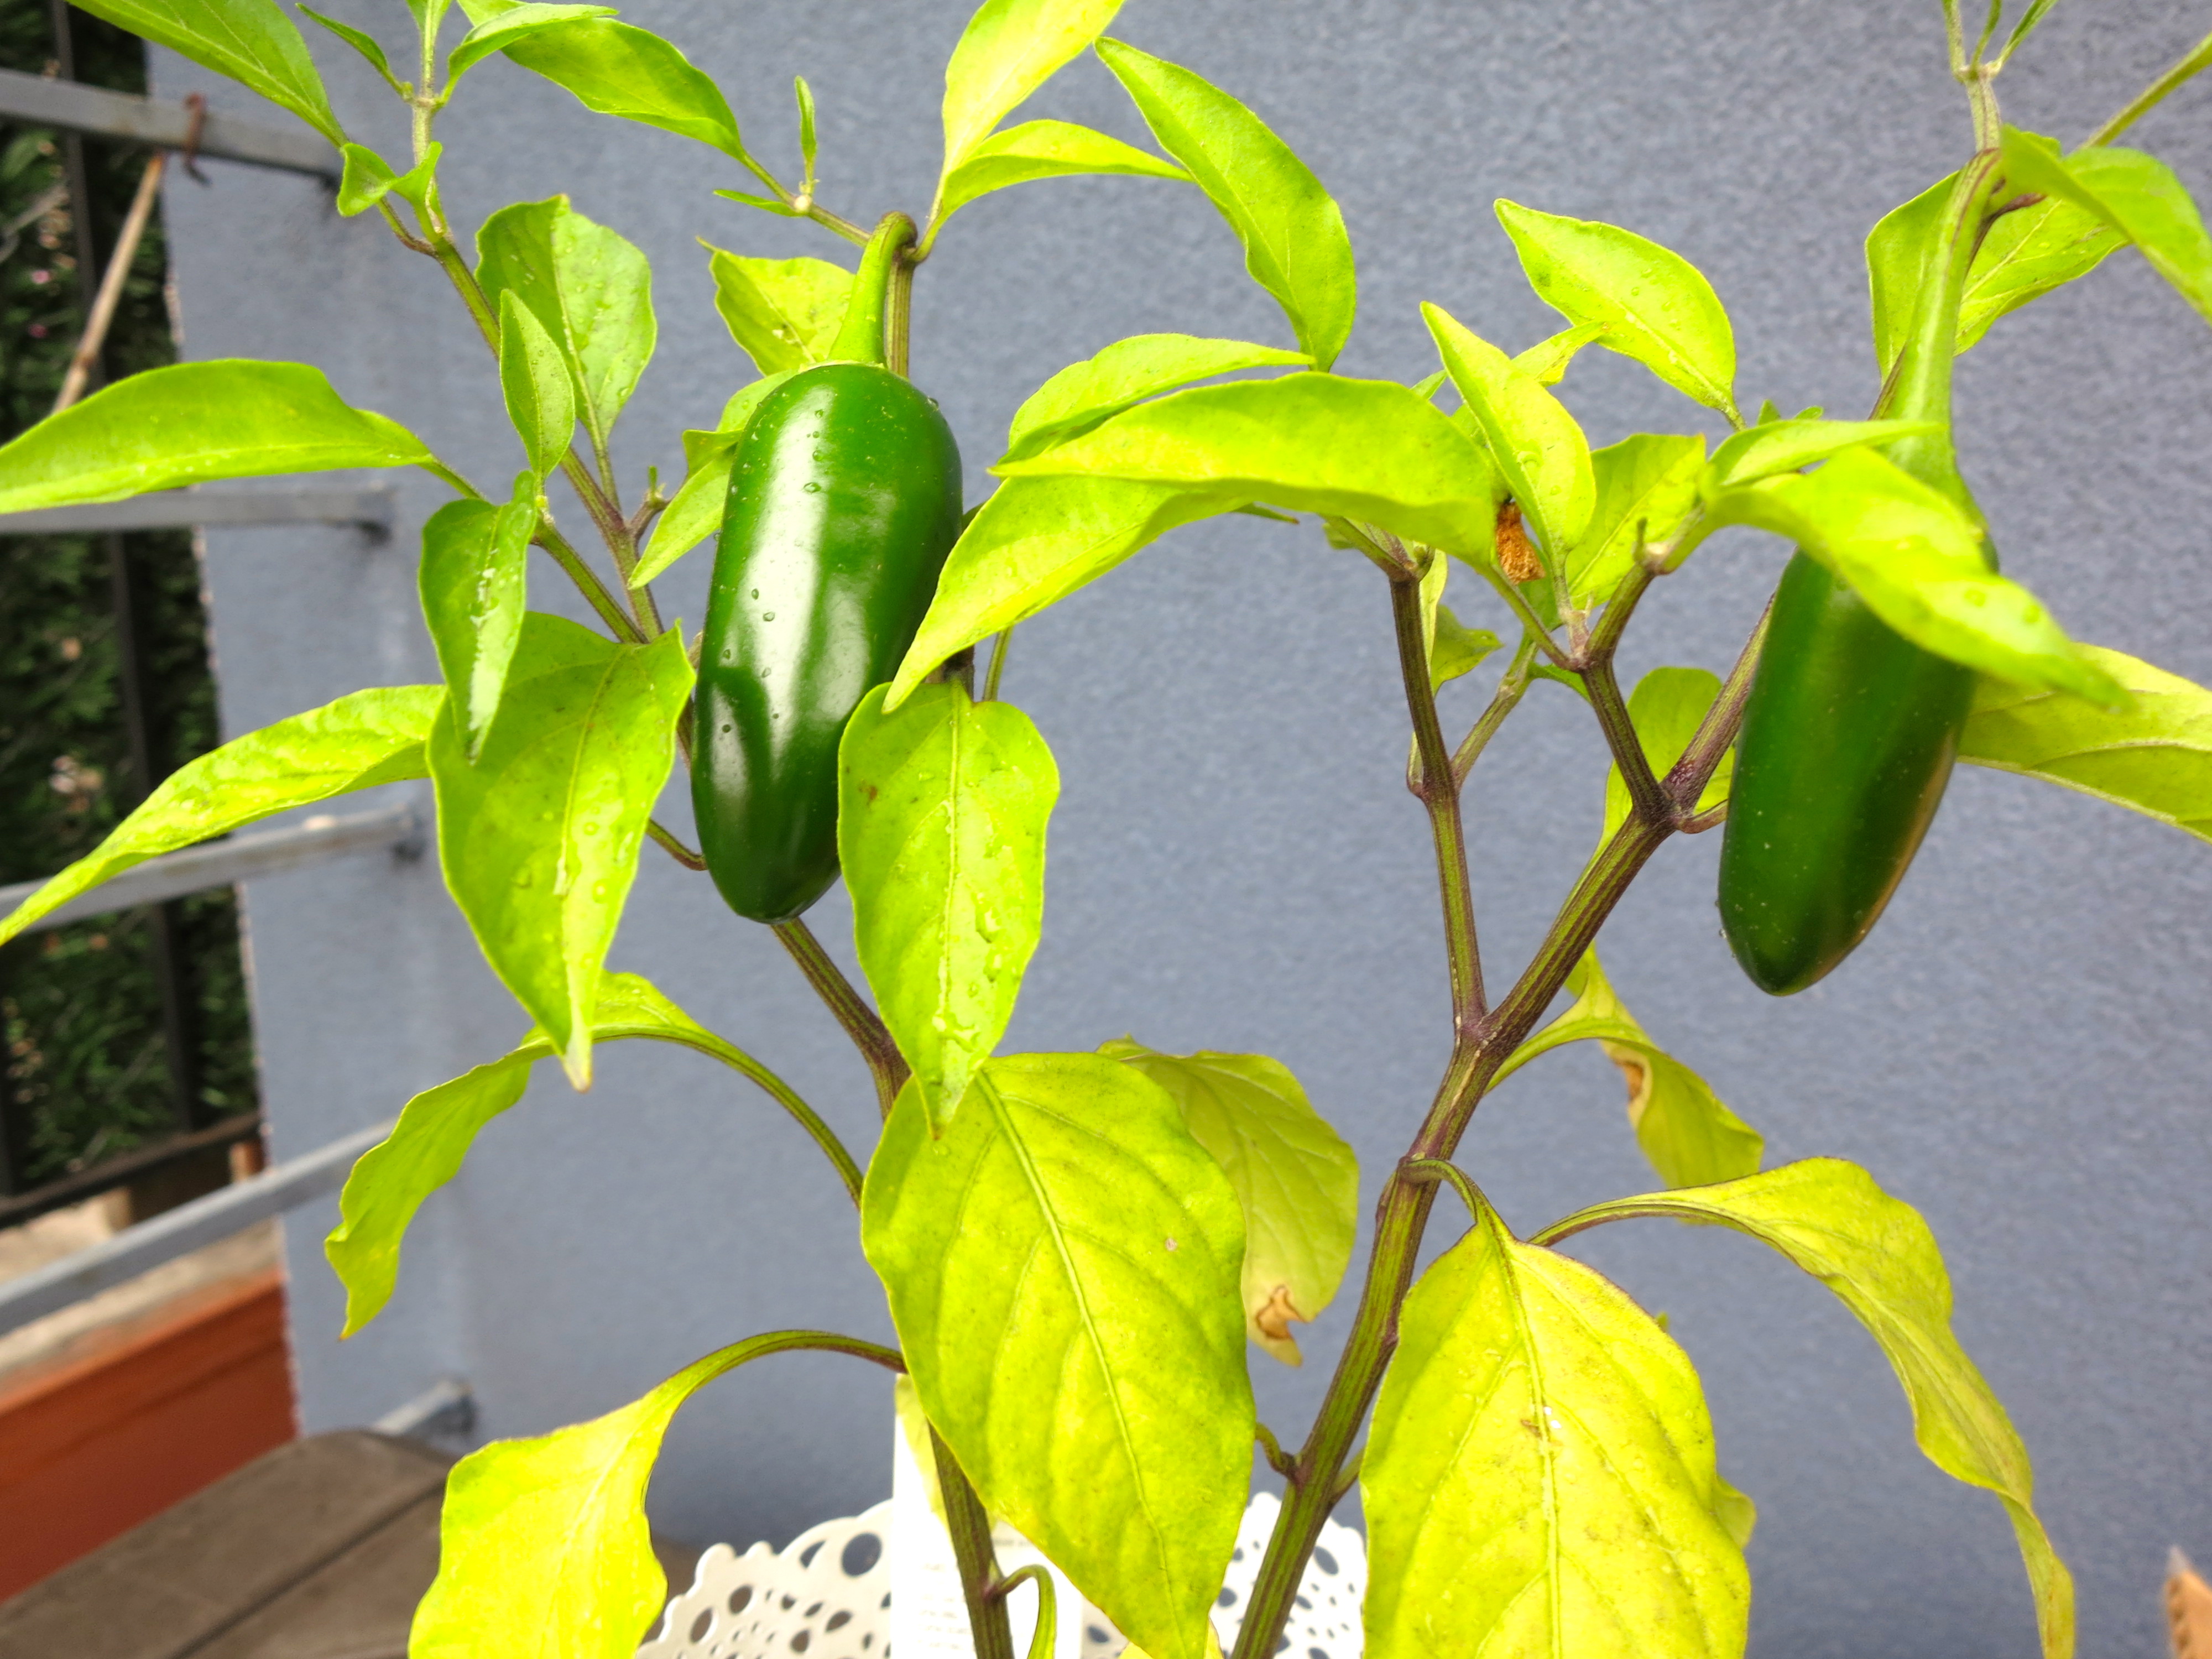
This year’s crop in its entirety. So sad, so sad.

Jalapeño Popper Closeup

PROSCIUTTO-WRAPPED JALAPEÑO POPPERS

12 – 15 whole jalapeño peppers, seeded 

8 ounces cream cheese

4-oz package of prosciutto

toothpicks

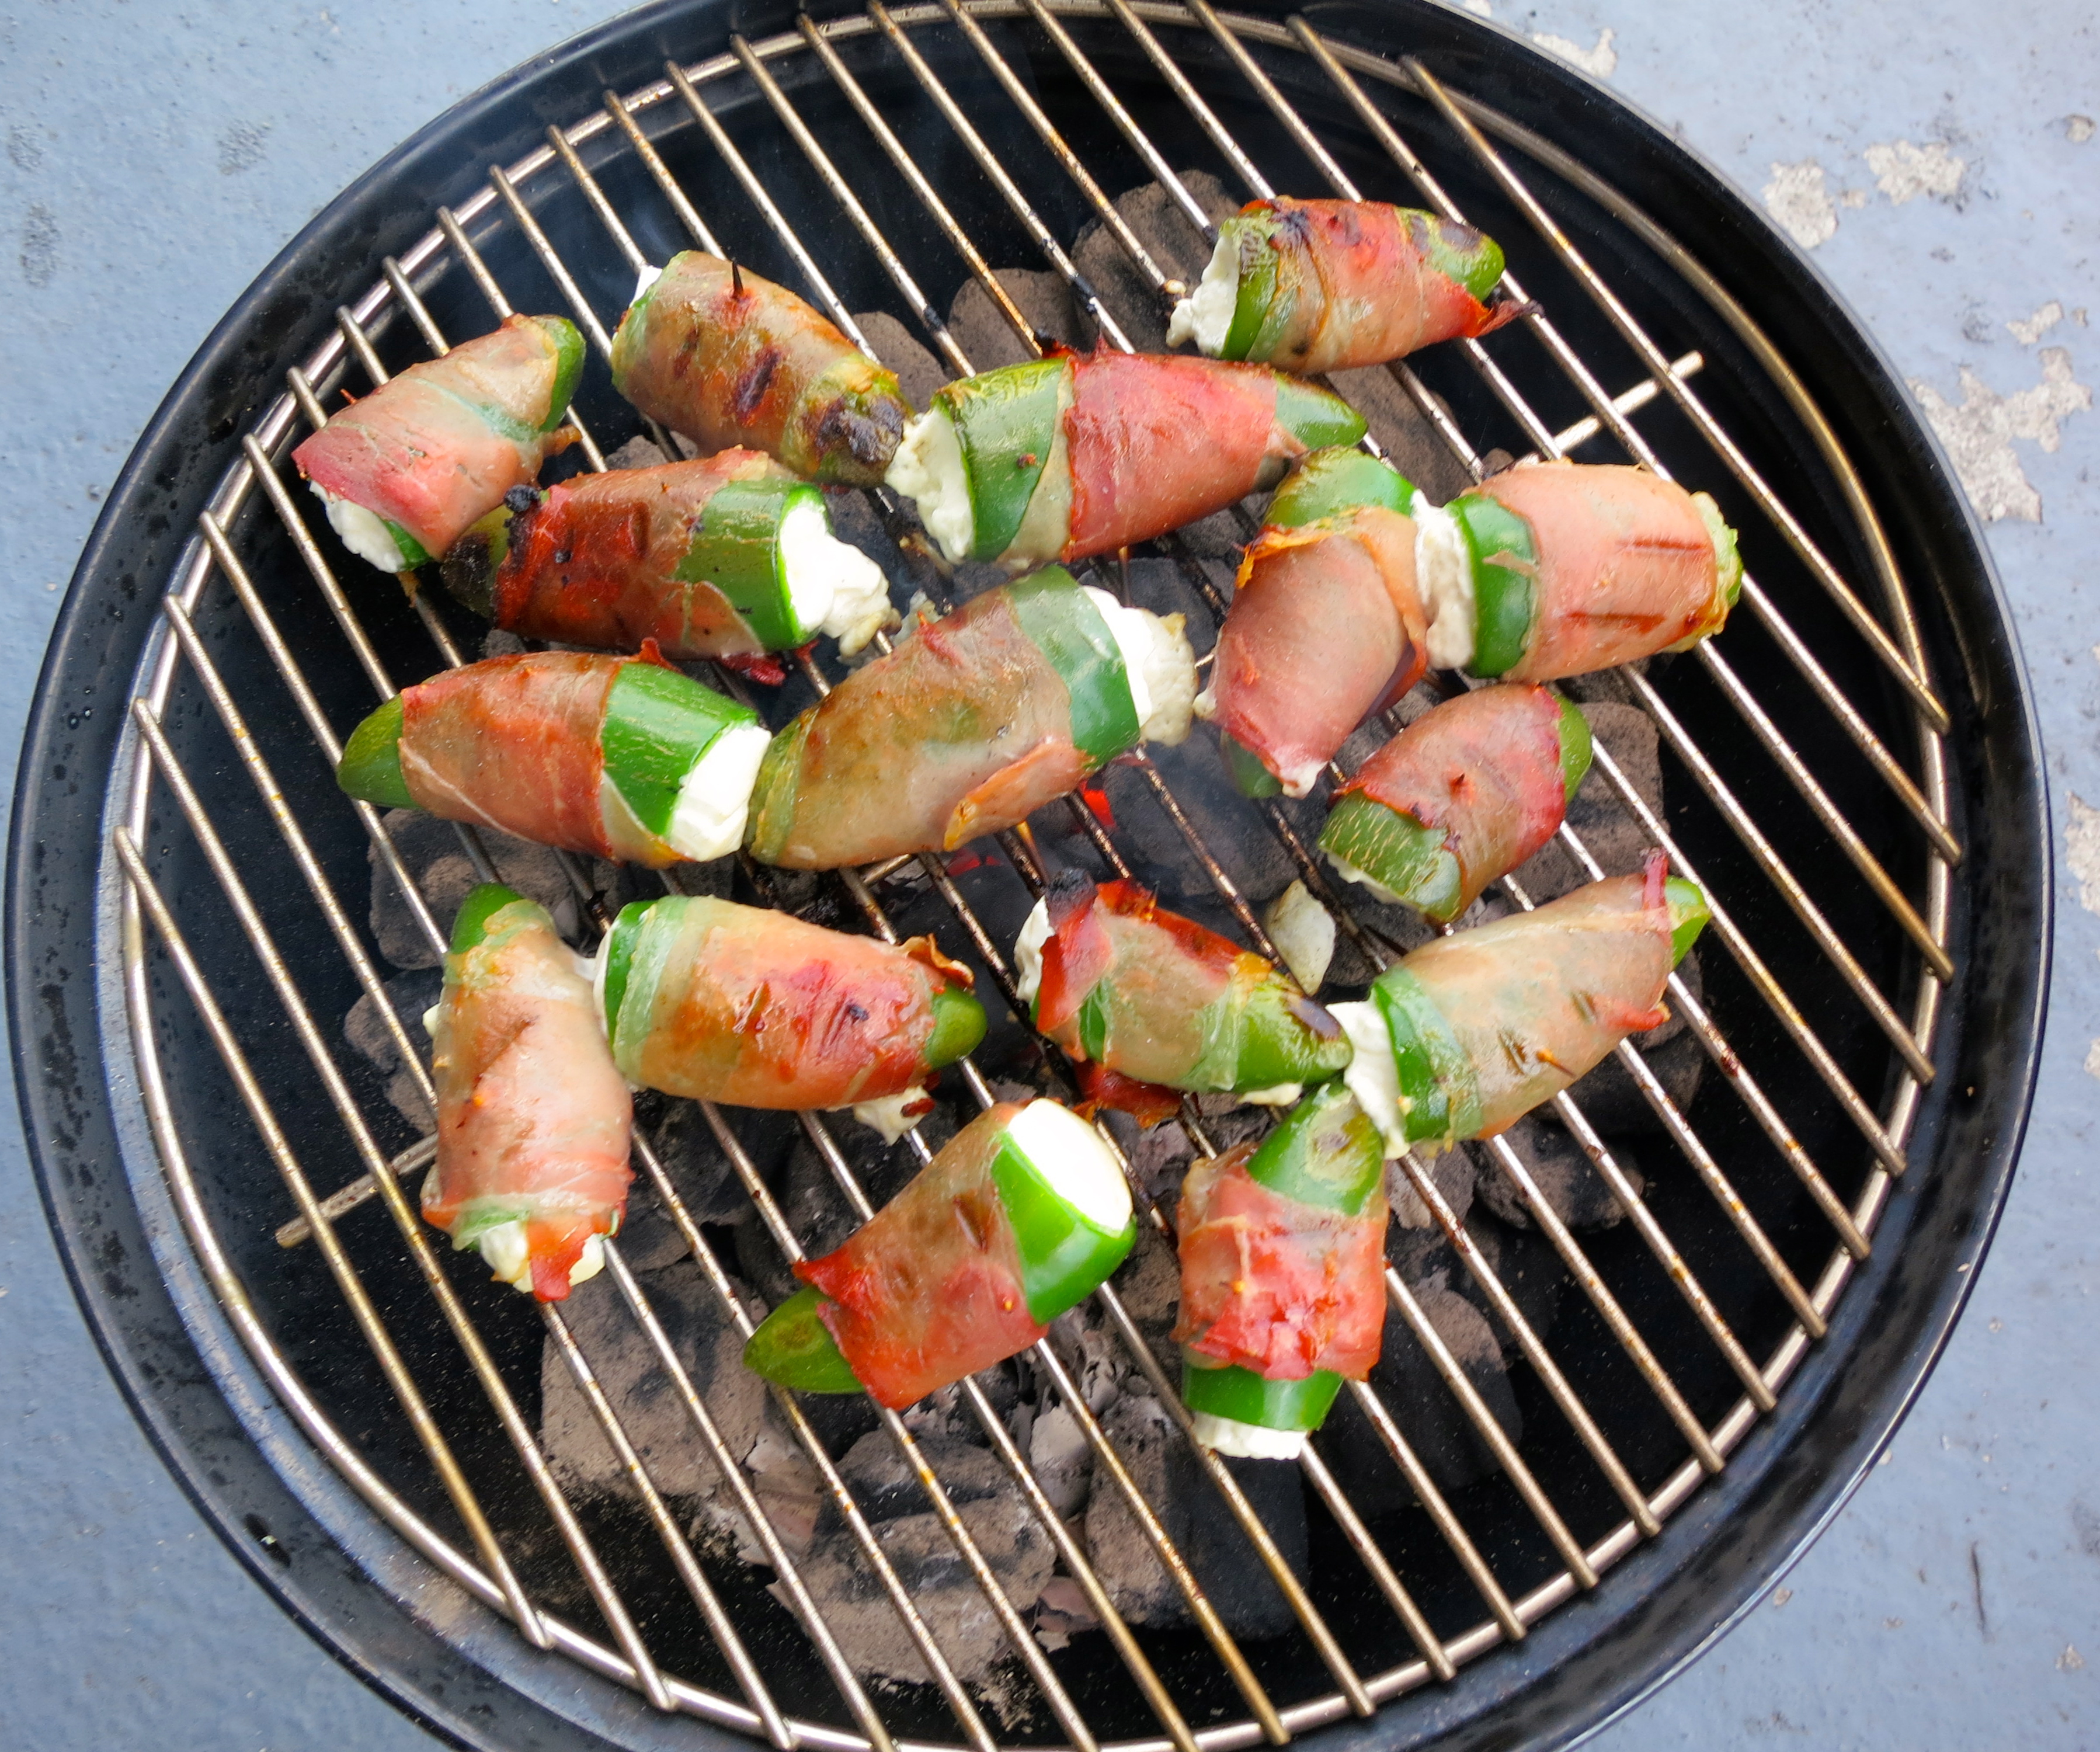
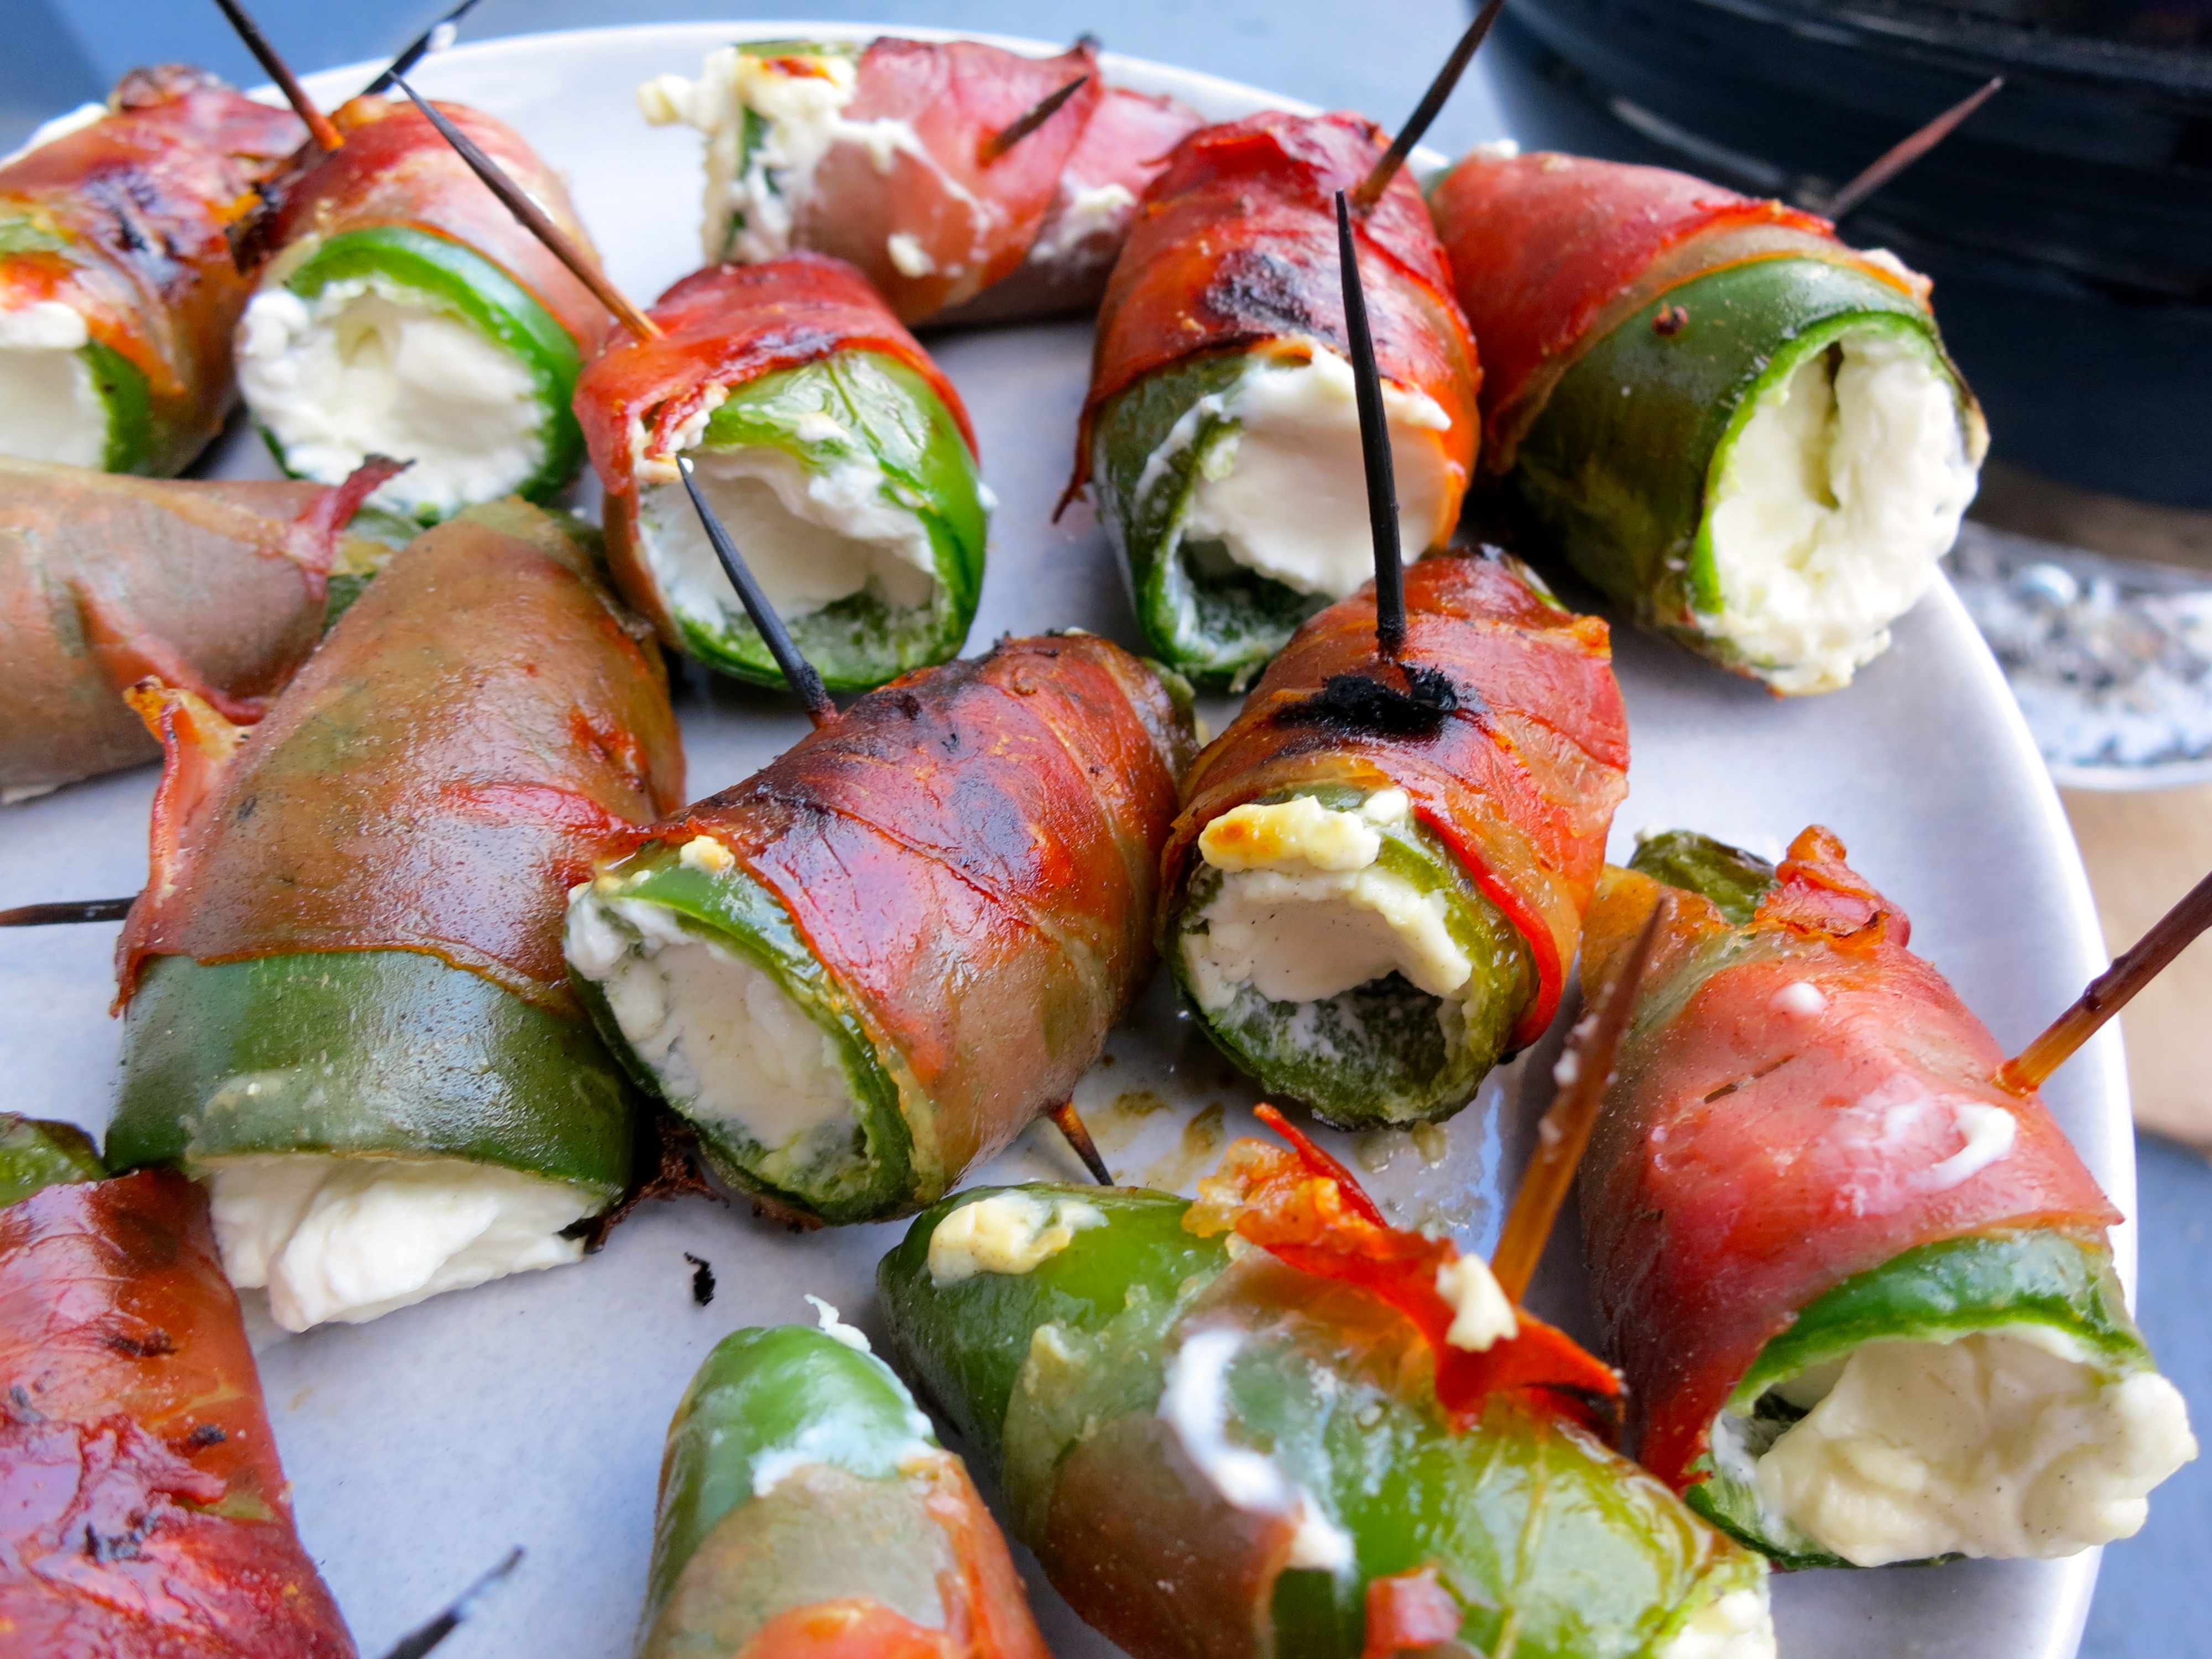
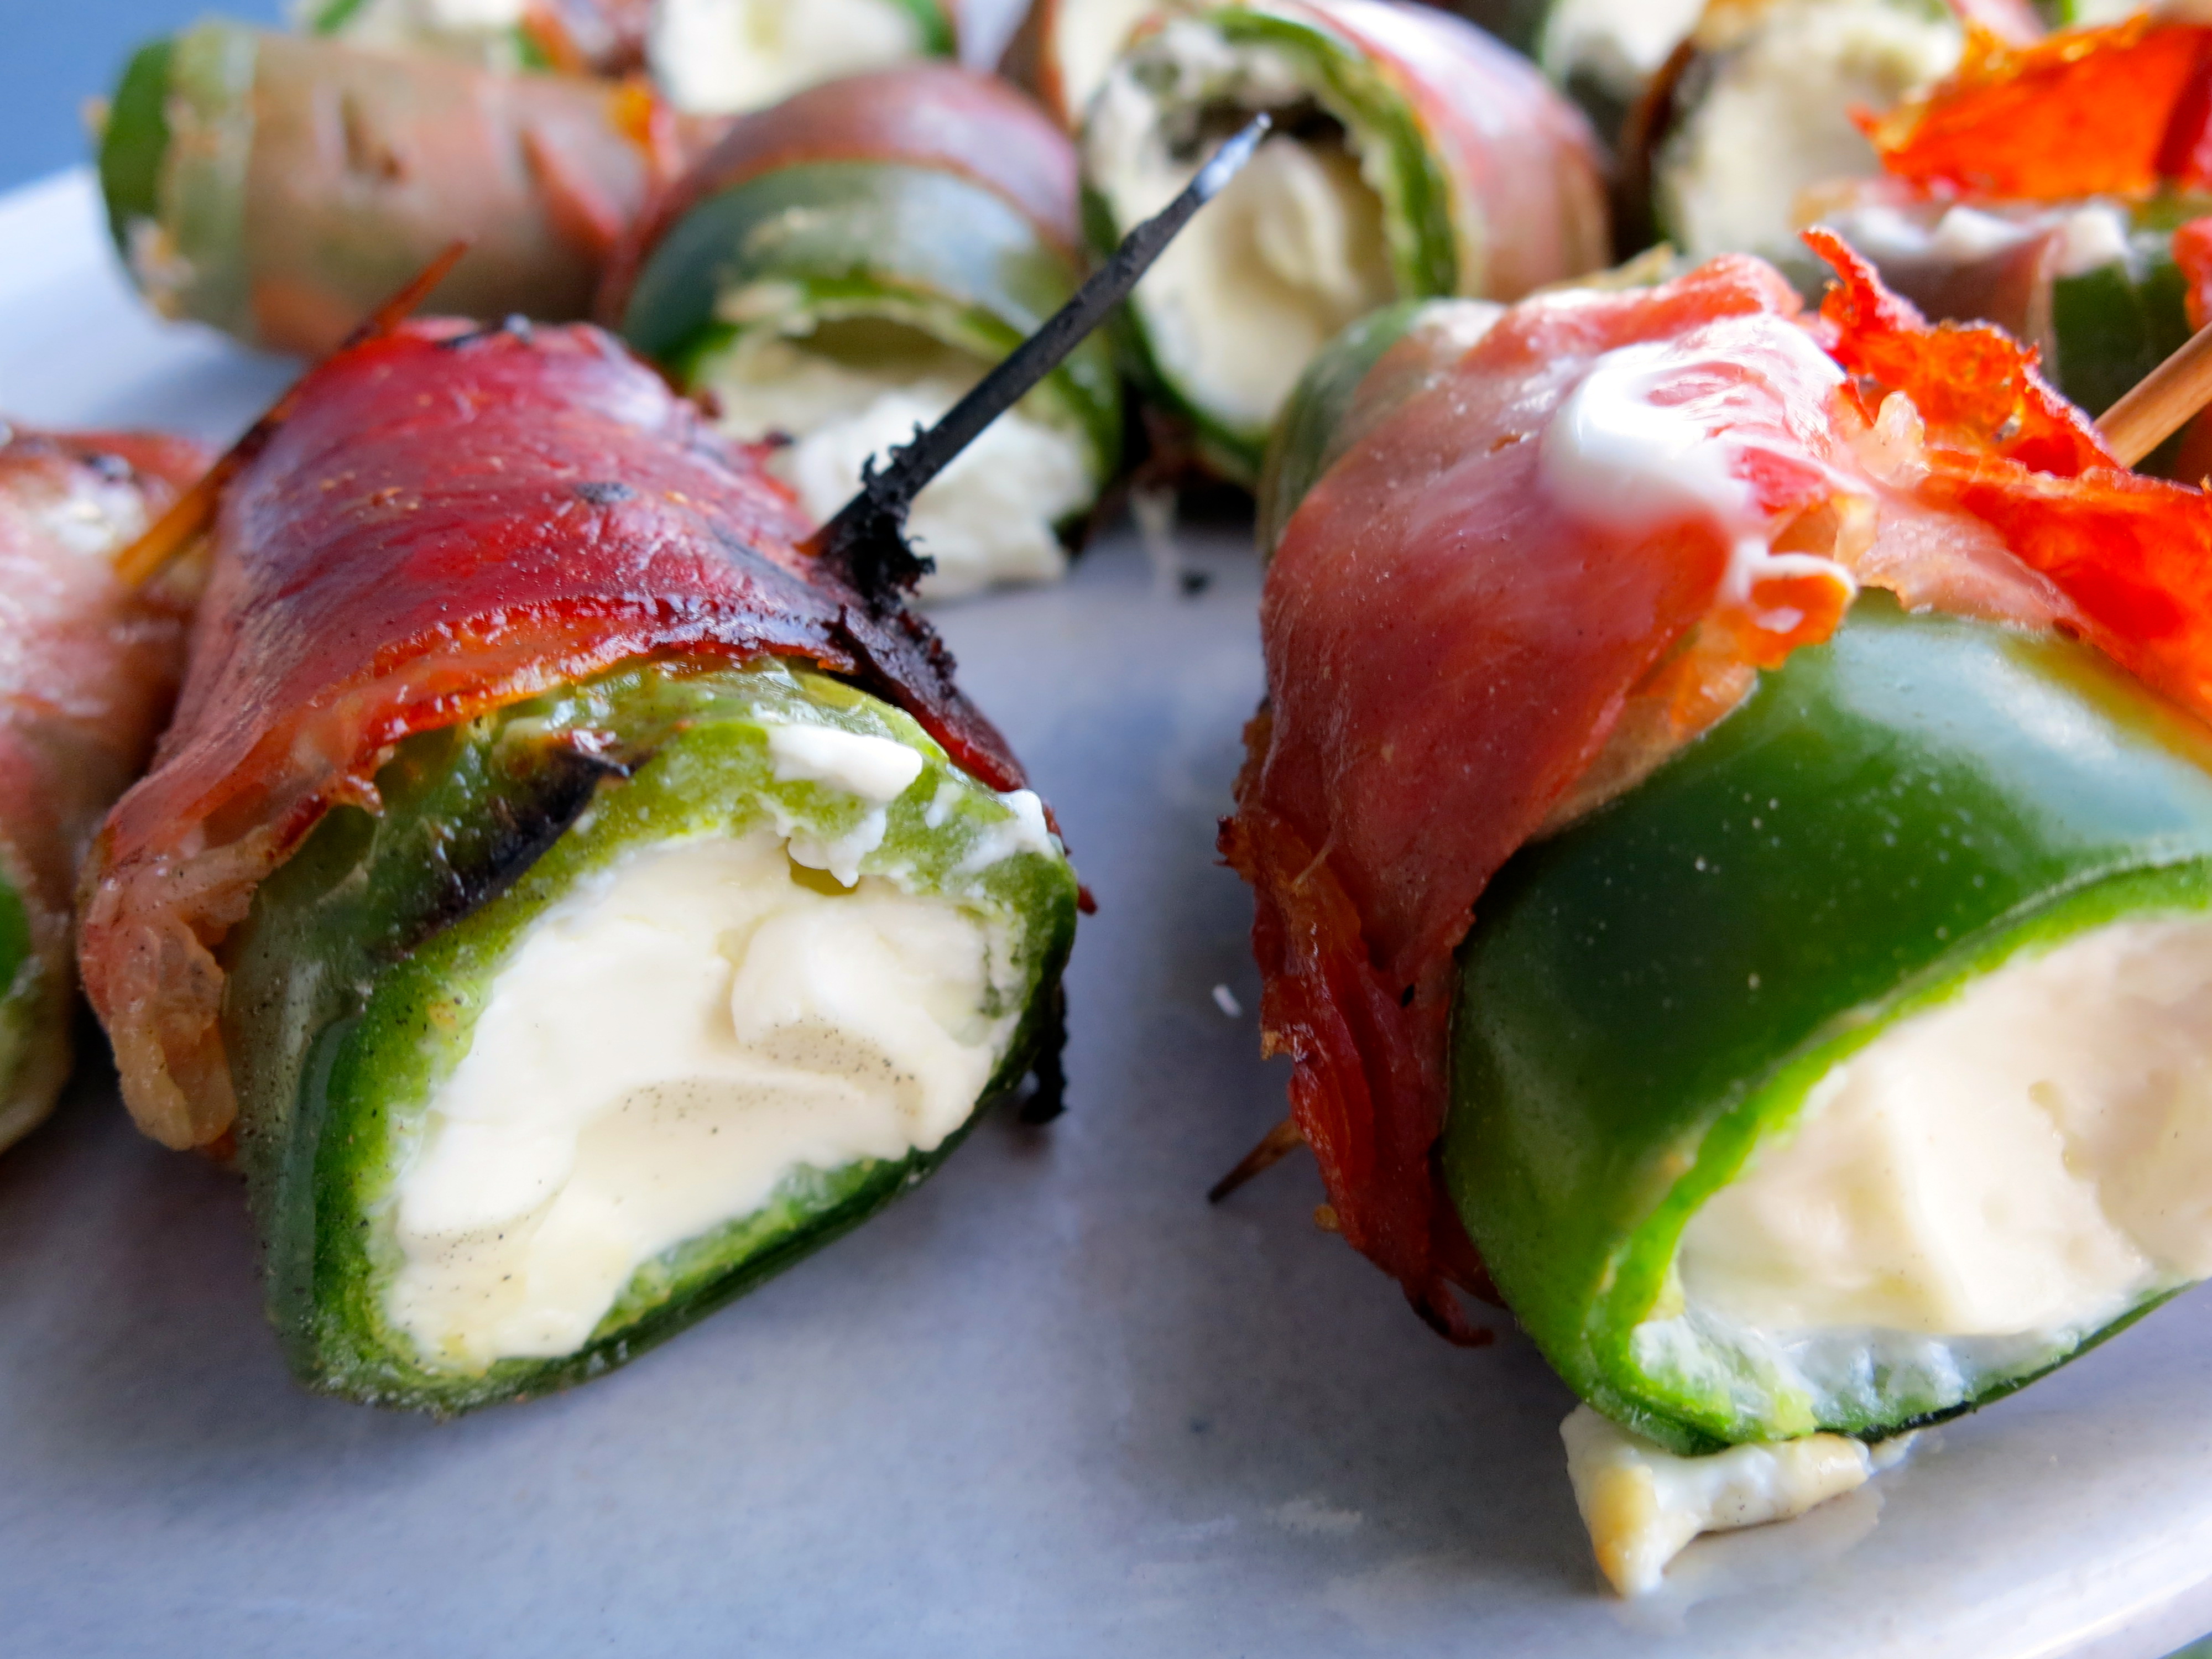
To seed the jalapeños but leave them whole, slice off the stem at the top and use a thin knife to scrape out the seeds. Be careful – wear rubber gloves if necessary. Stuff each pepper full of cream cheese, then wrap the peppers in strips of prosciutto and secure with toothpicks. Place on hot charcoal grill until peppers are charred and prosciutto is crispy, flipping halfway through (approximately 5-10 minutes total). Allow to cool slightly before eating as the melted cream cheese will be very hot.

Recipe: Spicy Thai Noodles with Plums & Bok Choy

05 Monday Aug 2013

Posted by Anonymous in entrees, recipes

≈ Comments Off on Recipe: Spicy Thai Noodles with Plums & Bok Choy

Tags

bok choy, chicken, dinner, food, healthy, nectarines, noodles, pasta, plums, recipe, salad, spicy, stone fruit, Thai

Thai Noodles with Plums & Bok Choy

Mmm, such a tasty summer entree. This recipe has survived dinner parties from Chicago to Buenos Aires, and every time I make it, it’s a bit different based on what’s in-season and what ingredients I have access to. In Buenos Aires, the wide variety of ethnic food products we’re accustomed to in the United States was immensely narrowed down, but with a little creativity (and a heavy hand with the not-spicy spices) I made it work.

The flavors and textures in this dish are unexpected and fresh. It’s a combination of juicy stone fruit, slightly bitter bok choy and slurp-worthy noodles tossed in a peppery-sweet sauce with a spicy kick. If spicy’s not your thing, omit the cayenne pepper and go easy on the crushed red pepper. I tend to use whole grain angel hair or soba noodles, but ramen or rice noodles would work well, too. And I grab whatever stone fruit looks most appealing. Nectarines work really well, but these plums were too pretty to pass up.

This is another oldie but a goodie adapted from Better Homes & Gardens.

Thai Noodles Closeup

SPICY THAI NOODLES WITH PLUMS & BOK CHOY

1 lb. chicken tenderloins

4 ounces of noodles

1/4 cup chicken stock

3 Tablespoons low-sodium soy sauce

2 Tablespoons hoison sauce

1 Tablespoon sugar

1 Tablespoon olive oil

2 teaspoons toasted sesame oil

3 cloves garlic, minced

1 1/2 teaspoons grated fresh ginger

1 teaspoon crushed red pepper

1/2 teaspoon cayenne pepper

1/8 teaspoon ground black pepper

3 nectarines and/or plums, sliced

one bunch of bok choy

1 green onion, thinly sliced

Cook the tenderloins in a small amount of boiling water in a large skillet, covered, for 12 to 15 minutes or until no longer pink. Drain and cool slightly, then slice against the grain. Cook noodles according to package directions. While the pasta’s cooking, whisk together the chicken stock, soy sauce, hoison sauce, sugar, olive oil, sesame oil, ginger, crushed red pepper, cayenne pepper and black pepper in a small bowl. Drain the cooked pasta, rinse in cool water and toss it with about 3/4 of the dressing. Divide the pasta up on your serving plates, and top with chicken, fruit, bok choy and green onions. Drizzle with the remaining dressing.

Pisco Sours & Comfort Food on Peru’s Southern Coast

04 Thursday Apr 2013

Posted by Anonymous in drinks, peru, recipes, travel

≈ 3 Comments

Tags

bistec a lo pobre, cancha, chaufa, cocktails, corn, food, fried rice, islas ballestas, nazca lines, peru, pisco, pisco sours, punta hermosa, restaurants, steak and eggs

To the beach!

After leaving Arequipa, we made a brief stop in Nazca to check out the mysterious Nazca lines, ancient geoglyphs depicting more than 70 animals and believed to have been created by the Nazca culture between 400 and 650 AD. My fear of heights and tiny propeller planes prevented us from doing a flyover, but we settled for climbing a lookout tower to scope out some of the sand drawings.

Nazca Lines

Because we’re not going to make it to the Galapagos, we decided instead to tour the Islas Ballestas in Paracas, affectionately referred to as the “poor man’s Galapagos”. In addition to the ginormous candelabro sand drawing, we got to see huge colonies of sea lions, adorable Humboldt penguins, and more birds than should be able to fit on one rock.

Islas Ballestas

Then on to Pisco, the home of the Perú’s world-famous national drink, the pisco sour. Pisco is a grape brandy native to Perú and Chile, best complemented by the tartness of lime juice. To make a Peruvian Pisco Sour, mix 3 ounces of pisco, an ounce of simple syrup or a Tablespoon of sugar, the juice from 2 – 3 limes, a few cubes of ice, and an egg white in a blender. Top the frothy mixture with a few dashes of Angostura bitters and enjoy.

Pisco Sours and Cancha

As we learned when sitting down to drinks or a meal, many Peruvian restaurants serve cancha to nibble on, as bars in the USA may serve peanuts. Cancha is toasted corn kernels, served golden brown and crunchy topped with plenty of salt. I couldn’t stop marveling at the size of corn kernels in Perú, and I have yet to find a satisfactory answer for how they get so huge.

Peruvian Corn and Cancha

When we weren’t at the hostel grilling up fresh-caught bonito, a delicious firm-textured fish in the same family as tuna, we were all about the comfort food. Meal highlights from our stay in surf mecca Punta Hermosa include a delicious chaufa de pollo, one of the many delicious Peruvian takes on Chinese fried rice.

Chaufa de Pollo

One more than one occasion we also devoured bistec a lo pobre, one of our favorite South American dishes consisting of a super flavorful thin-pounded steak and a runny fried egg served over crispy fries. As a bonus, this version included some sizzling salchichas.

Bistec a lo Pobre

I think it’s safe to say my commitment to healthy eating on this trip has gone right out the window. Sorry I’m not sorry.

Campfire Cooking: Hobo Pies

12 Tuesday Feb 2013

Posted by Anonymous in argentina, breakfast and brunch, chile, desserts, entrees, recipes, travel

≈ 2 Comments

Tags

Argentina, campfire, Camping, camping food, chile, food, hobo pies, mountain pies, sandwiches, the beach, travel

Why is this road so empty?

The wide open road heading into Paso San Francisco.

We made our way through northern Argentina more quickly than expected. Since we’ve had the opportunity to explore Salta, Tucumán, and Mendoza on previous trips, we basically made a beeline from Brazil to the Chilean coast. We crossed into Chile via the little used Paso de San Francisco, which included more than 100 kilometers of unpaved, extremely bumpy and winding roads through the Andes…an adventure that explains why we had the road virtually to ourselves.

Emerging from Paso San Francisco into the Atacama Desert in Chile

Emerging from Paso San Francisco into the Atacama Desert in Chile

Now we’re slowly working our way up the coast of Chile, where many of the beaches are wide open for public use, fishing, and camping. Having the opportunity to pitch a tent on a peaceful beach with the waves breaking and the sky overflowing with brilliant stars is extra special. And after subsisting on a diet of yogurt, crackers, canned tuna and mouthfuls of desert dust for a few days on the road, we were ready for some tasty camp food.

Playa Cifuncho Camping

I was first introduced to hobo pies by my high school BFF during a camping trip in Assateague Island, Maryland – another spot I highly recommend for some quality beach camping. When she whipped out her hobo pie maker, I admit that I did not believe the hype. It’s basically a square, sandwich-sized pie iron and I prepared myself for the equivalent of grilled cheese. But after devouring deliciously crispy mini pepperoni pizzas pockets and polishing off a S’mores sammie oozing melted chocolate and marshmallows, I was thoroughly convinced that I needed a hobo pie maker, stat. (Thanks Suzie! I should have never doubted you).

Hobo Pies

There’s really no recipe needed for a delicious hobo pie and experimenting is half the fun. The basic requirements are the pie iron (which you can purchase at camping/outdoor stores or online), some non-stick cooking spray, sliced bread, and of course, a campfire. Just grease the pie iron with the cooking spray, make your sandwich with your ingredients of choice, lock it up and stick it in the fire. Cooking time varies depending on the strength of your fire, but I generally check within a minute or so in case I want to adjust the positioning to reduce the potential for burnt toast. Simple, right? And something about cooking on a campfire just makes everything taste better.

With the limited ingredient options that come with traveling through South America, we’ve played it somewhat safe thus far. Toasted ham and cheese with a slice of tomato is a good bet for a quick and easy breakfast or lunch. For dinner, turkey, cheese and tomato sauce with some freshly ground black pepper hits the spot.  But I dream of making delicious Reuben Hobo Pies, or pies stuffed with brie and strawberries, or maybe some peanut butter banana chocolate goodness….but that will have to wait til we’re back in the homeland.

Recipe: Polenta & Spinach Soup

11 Friday Jan 2013

Posted by Anonymous in appetizers and sides, entrees, recipes

≈ 1 Comment

Tags

comfort food, dinner, easy dinner, food, polenta, soup, spinach, vegetarian

Spinach & Polenta Soup

I admit, it may be a bit odd to make thick, hot soup when it’s pushing 90 degrees outside. But I’m on a mission to use up all of our food stuffs in the next week, including a half kilo of polenta. So, sorry husband! Sit in front of the fan and eat it.

Polenta is a ground cornmeal that has a smooth, creamy texture when cooked. It originated in Italy, so I suppose it’s no surprise that it’s so popular in Buenos Aires. According to Wikipedia it’s known as a “peasant food”, which seems kind of rude, right? But considering I’ve made at least five meals out of this one-kilo bag with no end in sight, I suppose I can see the correlation.

I actually purchased the polenta just to try this recipe out in the first place. It was so good that rather than expanding my polenta-cooking repertoire I just made it again…and again, and again. It’s cheap, super flavorful, and takes about 30 minutes to whip together. Well, 45 if you have to carefully clean each leaf of spinach, like I do.

The original recipe was from Bon Appétit. I’ve altered it to suit my preferences.

POLENTA & SPINACH SOUP

  • 6 cups (or more) of chicken broth
  • 3/4 cup polenta
  • 3 tablespoons flour
  • 3 tablespoons butter
  • 4 garlic cloves, minced
  • Coarse kosher salt
  • 8 ounces baby spinach leaves
  • Fresh shredded parmesan or sharp cheddar cheese

Bring 6 cups of broth to a simmer in a sauce pan; cover to keep warm. Whisk polenta and flour in heavy large pot. Add 1 cup hot broth; whisk over medium-high heat until smooth. Stir in butter and garlic; sprinkle lightly with coarse salt. Gradually add 5 cups hot broth by cupfuls. Boil gently over medium heat until polenta is tender and soup is creamy and thickened, whisking frequently and adding more broth to thin, if desired, about 15 to 25 minutes depending on the strength of your stovetop. Stir in spinach by handfuls; simmer until wilted, stirring often, 5 minutes longer. Season with more coarse salt and black pepper. Spoon into bowls and top with shredded cheese.

Recipe: Cinnamon Biscuit Rolls

26 Wednesday Dec 2012

Posted by Anonymous in breakfast and brunch, recipes

≈ 4 Comments

Tags

breakfast, brunch, Christmas, cinnamon biscuit, cinnamon roll, easy breakfast, kid-friendly food

Cinnamon Biscuit Roll

I love any excuse to make a special breakfast. And by “special”, I basically mean anything outside of cereal and smoothies. I like to experiment with breakfast, but I have my old standbys. This cinnamon biscuit roll recipe is one of them. It’s a treat I’ve used to mark special occasions from my college graduation to Christmas. I like them because I usually have all of the necessary ingredients on hand (no yeast involved) and they’re surprisingly quick to whip together, but feel no less celebratory for their ease.

The original recipe was from my childhood neighbor, who was a home economics teacher at my high school and who provided me with some of my first and most memorable experimental recipes. Egg drop soup, polvorones, croissants and other global cuisine found its way into my recipe list thanks to Mrs. Brewer, and I still have the printouts from junior high to prove it.

These biscuit rolls are more flaky than the average cinnamon roll, but still follow the most important cinnamon roll guideline: the gooey center is the best part.

Cinnamon Biscuit Rolls

CINNAMON BISCUIT ROLLS

2 cups of flour

1 T. baking powder

1 tsp. salt

1/3 cup shortening

3/4 cup milk

3 T. softened butter

4 T. sugar

2 T. brown sugar

2 tsp. cinnamon

3/4 cup powdered sugar

2 – 3 tsp. milk

Preheat oven to 425° F. Mix flour, baking powder and salt in a mixing bowl. Cut in the shortening with a fork or pastry blender until mixture looks like crumbs. Add milk and stir until well-blended. On floured surface, knead 10 times. Roll dough into large rectangle shape until 1/4 inch thick. Spread dough with softened butter. Mix sugars and cinnamon and sprinkle over butter. Roll up dough jelly roll style, starting at one of the narrower ends. With a sharp knife, cut into slices about one inch thick. Place on foil-lined cookie sheet. Bake for about 12 minutes.

Place powdered sugar and milk in a small Ziplock bag and squeeze until mixed and smooth. Cut away a small corner of the bag, and drizzle over warm rolls.

Christmas Feast-Worthy Roast Duck

24 Monday Dec 2012

Posted by Anonymous in entrees, recipes

≈ Comments Off on Christmas Feast-Worthy Roast Duck

Tags

christmas feast, dinner, duck fat, holiday dinner, poultry, roast duck

Simple Roast Duck

Growing up, Christmas always meant amazing home-cooked food. From the early morning breakfast (Magic Marshmallow Crescent Puffs, FTW!) all the way to the array of post-dinner cookies, it was day of continuous culinary delights. I still feel the same way today. Christmas is just not the same for me without a delicious home-cooked spread.

Ham was the tradition when I was a kid. In recent years, I dabbled in turkey. This year, I’m thinking duck.

Until recently, I’d only ever had duck at restaurants, hearing that it’s difficult to prepare at home. I was misinformed. To be sure, you can make it as complicated as you like, but a simple roast duck is delicious without all that craziness involving hair dryers and boiling pots of water. There may be an extra step or two involved, but when you carve into that melt-in-your-mouth bird, you will feel it’s well worth it.

Carving Duck

I followed a video recipe from the New York Times. It was low-maintenance, and the outcome was crispy, flavorful and Christmas feast-worthy for sure.

SIMPLEST ROAST DUCK (original recipe from the New York Times)

4 – 6 pound duck

1 Tablespoon kosher salt 

Aromatics of your choice: orange zest, toasted coriander, ground pepper, rosemary, garlic, onions, shallots, etc.

Fingerling potatoes, for an easy side dish

24 to 48 hours before you plan to serve the duck, trim off excess fat and skin around neck and tail areas. (This can be saved to render duck fat later). With a paring knife, prick the duck skin all over, sliding the knife between the skin and the flesh. This will release the fat so it will render while the duck roasts, making the skin nice and crispy. You don’t want to directly prick the flesh, as that will dry it out.

Season the duck, inside and out, with kosher salt and whatever aromatics you’d like to use. I used chopped fresh rosemary, garlic, and ground pepper. Put the duck in the fridge, uncovered, so that the skin can dry out a bit for the next 24 – 48 hours.

When you’re ready to roast the duck, preheat the oven to 450° F. Add more seasonings to the cavity. I used crushed garlic, sprigs of rosemary, and onion slices. Place in roasting pan, breast side down. If desired, toss the fingerling potatoes in the pan along the sides, to cook in the duck fat. Roast for 30 minutes. Lower oven temperature to 350° F, and roast for another 30 minutes. Flip the duck over in the roasting pan, so that it’s breast-side up. If desired, use a turkey baster to suction up some of the fat in the bottom of the pan, to prevent it from smoking. Put the duck back in the oven for another 1 – 2 hours.

To check for done-ness, you can wiggle the legs of the duck. They should feel loose. A meat thermometer inserted into the thickest part of the thigh should register at least 175° F.

Roast DuckWhatever you decide to serve for your holiday feast this year, we hope you enjoy! Felices Fiestas!

Recipe: Caprese Frittata with Jamón Crudo

14 Friday Dec 2012

Posted by Anonymous in breakfast and brunch, entrees, recipes

≈ Comments Off on Recipe: Caprese Frittata with Jamón Crudo

Tags

baked eggs, breakfast, breakfast and brunch, breakfast for dinner, brunch recipe, caprese, cheese, eggs, frittata, mozzarella, tomato, tomato basil

Slice of Caprese Frittata with Jamón Crudo

Yep. More eggs, people. I warned you we eat them a lot!

While I’m sure this would make a lovely breakfast or brunch recipe, we’ve only ever eaten it for dinner. And to be honest, that’s usually because I’ve taken stock of what’s nearing the end of its lifespan in the fridge and realized we need to use up some eggs. But it’s hearty enough to make a filling (and quick) dinner, and it’s super tasty.

This is another recipe that lends itself to substitution. Whether you just happen to have red pepper or onion on hand, an overabundance of chives in the garden, or you bought an economy-sized bag of oregano that isn’t going to make the cut as you pack to leave the country (ahem), anything goes. Just do not skip those chunks of mozzarella cheese. DO NOT! Nor should you try to be lazy about it by adding grated mozzarella instead. Buy a block and cut up those chunks, you’ll thank me for it later when you’re savoring the soft gooey deliciousness of a pocket of melted cheese.

Frittata Closeup

CAPRESE FRITTATA WITH JAMÓN CRUDO

10 large eggs
1/4 cup milk
1/4 cup freshly grated Parmigiano-Reggiano cheese
1/4 cup chopped basil
3/4 teaspoon salt
1/2 teaspoon freshly ground pepper
2 tablespoons olive oil
2 shallots, thinly sliced
1 tomato, diced
4 thin slices jamón crudo, bondiola, or prosciutto, chopped
6 ounces mozzarella, cubed

Preheat the oven to 350°F. In a bowl, beat the eggs with the milk, Parmigiano, basil, salt and pepper. In an ovenproof nonstick skillet, heat the oil. Add the shallots and cook over low-moderate heat until softened. Stir in the tomato and prosciutto until warm. Add the eggs. Cook without stirring until the eggs are beginning to set on the bottom, about 3 minutes. Poke the mozzarella into the eggs. Bake the frittata until just set, about 20 minutes. Shake the skillet over a burner on high heat until the frittata releases, 10 seconds. Invert the frittata onto a plate and let cool for 5 minutes, then cut into wedges and serve.

Recipe: Carnitas

05 Wednesday Dec 2012

Posted by Anonymous in entrees, recipes

≈ 4 Comments

Tags

carnitas, david lebovitz, dinner party, easy dinner, feeding a crowd, mexican food, pork, slow roasted pork

Carnitas

I was introduced to the glory of carnitas years ago, when friends in Chicago invited us over for “Carnitas Night” and we stuffed ourselves with guacamole, black bean dip, tres leches, margaritas and the star of the show:  tender, flavorful slow-roasted pork. I was hooked. (Thanks, Amy and Matt!)

But with so many recipes and preparation recommendations floating around, it took me a while to perfect my favorite version of the dish. After lots of searching and taste testing, David Lebovitz’s carnitas recipe stood head and shoulders above the rest. This version is adapted from his, with the spice factor kicked up a notch and as always, heavier on the garlic.

Carnitas2

What I love about carnitas is its simplicity. The intensity of the flavor belies the fact that it’s so easy to prepare. And it feeds a crowd, just add some plantain chips and guacamole to round out the party. I like to serve the meat with corn tortillas and a simple avocado pico de gallo, but feel free to add whatever toppings you like: shredded cheese or queso fresco, sour cream, hot sauce, etc.

Carnitas3

CARNITAS (adapted from recipe by David Lebovitz)

4-5-pounds boneless pork shoulder (bondiola) or pork butt, cut into 5-inch chunks and trimmed of excess fat
1 tablespoon coarse sea salt
1 tablespoon canola or neutral vegetable oil
water
1 cinnamon stick
1 Tablespoon chile powder
dried hot peppers, to taste
2 bay leaves
¼ teaspoon ground cumin
5 cloves of garlic, peeled and thinly-sliced

Rub the pieces of pork shoulder all over with salt. Refrigerate overnight. (You can skip this step if you want. Just be sure to salt the pork before searing the meat.) Heat the oil in a roasting pan or oven-safe pot set on the stovetop. I use my Le Creuset French oven. Cook the pieces of pork in a single layer until very well-browned, turning them as little as possible so they get nice and dark before flipping them around.

Once all the pork is browned, remove it from the pot and blot away any excess fat with a paper towel, then pour in about a cup of water, scraping the bottom of the pan with a flat-edged utensil to release all the tasty brown bits.

Heat the oven to 350F (180C) degrees. Add the pork back to the pan and add enough water so the pork pieces are 2/3rd’s submerged in liquid. Add the cinnamon stick and stir in the chile powder, dried chilies, bay leaves, cumin and garlic.

Braise in the oven uncovered for 3½ hours, turning the pork a few times during cooking, until much of the liquid is evaporated and the pork is falling apart. Remove the pan from the oven and lift the pork pieces out of the liquid and set them on a platter. Once the pork pieces are cool enough to handle, shred them into bite-sized pieces, about 2-inches (7 cm), discarding any obvious big chunks of fat if you wish (but I love them, mmmm). Return the pork pieces back to the roasting pan and cook in the oven, turning occasionally, until the liquid has evaporated and the pork is crispy and caramelized. It will depend on how much liquid the pork gave off, and how crackly you want them.

Giving Thanks for Pumpkin Rolls

27 Tuesday Nov 2012

Posted by Anonymous in desserts, recipes

≈ 4 Comments

Tags

dessert, dinner party, expat life, mashed potatoes, pumpkin roll, sweet potato casserole, Thanksgiving

Gaspar and I once again hosted a Thanksgiving feast to share the best of our culture with our friends here in Buenos Aires. This time around, planning was a breeze. Amazing what a difference language skills and a bit of experience can make. Having nailed the acrobatics involved in cooking for 15 people with one tiny stove last year, I had all the “make-ahead” recipes lined up. And after frantically scouring the city last year for Thanksgiving staples like pumpkin, turkey and pecans that don’t seem to be embraced in Argentine cuisine, I knew where to find what I needed. A quick rundown for any newcomers: small frozen turkeys (pavitos) can be found at Jumbo, pecans (nueces – yes, I know that just translates to “nuts” but I don’t make the rules) at Mercado de San Telmo or Barrio Chino, sweet potatoes (batatas) are everywhere, the best brown sugar substitute is azucar negra, and things like cranberries, marshmallows and canned pumpkin do not exist here so “import” them if you can.

I’d had big plans for featuring all the various dishes and recipes I used, but as I should have known, by the time everything was ready and guests were arriving, the last thing on my mind was taking photos. But trust me, if you’re ever looking for a super tasty mashed potato recipe that can be made ahead, this is the one. And this sweet potato casserole got non-stop rave reviews from everyone. I use evaporated milk instead of regular, double the vanilla, and triple the amount of the pecan topping. I love me some crispy pecan topping, what can I say?

At least I got some good pics of the pumpkin roll. I use the recipe from Libby’s without much modification. Pumpkin rolls can take some practice, and are rarely “perfect” but the taste is what counts, right? My advice would be: 1.)  do not overmix when adding the flour. 2.) Make sure you spread the batter as evenly as possible in the pan. 3.) Thoroughly cover your tea towel with powdered sugar (there’s no such thing as too much, really) and 4.) When spreading the cream cheese filling onto the cake, go heaviest on the end that will be the center of the roll and make sure you’re not skimping on the edges.

If you live in Buenos Aires, good news! Pumpkin rolls are now available for special order. Just contact me here.

LIBBY’S PUMPKIN ROLL

For the cake:

  • 1/2 cup powdered sugar (to sprinkle on towel)
  • 3/4 cup all-purpose flour
  • 1/2 teaspoon baking powder
  • 1/2 teaspoon baking soda
  • 1/2 teaspoon ground cinnamon
  • 1/2 teaspoon ground cloves
  • 1/4 teaspoon salt
  • 3 large eggs
  • 1 cup granulated sugar
  • 2/3 cup LIBBY’S® 100% Pure Pumpkin

For the filling:

  • 1 pkg. (8 oz.) cream cheese, at room temperature
  • 1 cup powdered sugar
  • 6 tablespoons butter, softened
  • 1 teaspoon vanilla extract
  • Powdered sugar (for decoration)

Preheat oven to 375° F. Grease 15 x 10-inch jelly-roll pan; line with wax paper. Grease and flour paper. Sprinkle a thin, cotton kitchen towel with powdered sugar.

Combine flour, baking powder, baking soda, cinnamon, cloves and salt in small bowl. Beat eggs and granulated sugar in large mixer bowl until thick. Beat in pumpkin. Stir in flour mixture. Spread evenly into prepared pan.

Bake for 13 to 15 minutes or until top of cake springs back when touched. (If using a dark-colored pan, begin checking for doneness at 11 minutes.) Immediately loosen and turn cake onto prepared towel. Carefully peel off paper. Roll up cake and towel together, starting with narrow end. Cool on wire rack.

For filling, beat cream cheese, 1 cup powdered sugar, butter and vanilla extract in small mixer bowl until smooth. Carefully unroll cake. Spread cream cheese mixture over cake. Reroll cake. Wrap in plastic wrap and refrigerate at least one hour. You can also freeze the pumpkin roll if making in advance. Sprinkle with powdered sugar before serving.

Photo credit for this one goes to one of my favorite dinner guests, Marina Coser

← Older posts

Enter your email address to subscribe to this blog and receive notifications of new posts by email.

Join 2,479 other subscribers

One Day Cafe on Facebook

One Day Cafe on Facebook

algarrobo antofagasta appetizers and sides argentina brazil breakfast and brunch buenos aires chile desserts drinks ecuador entrees etiquette food trends france lima los órganos mendoza north carolina peru pittsburgh recipes restaurants san pedro de atacama tips & how to's travel Uncategorized uruguay

katrina’s twitter feed

  • RT @EliManning: Verizon is giving away Super Bowl tickets, and obviously I’d love to be your +1. Head to Verizon and enter for a chance to… 3 days ago
  • RT @rgay: We’re hanging with my niece while she does homework and ummm homework has changed since I was a kid fr. It’s so intense! Like wha… 4 weeks ago
  • RT @DrewBledsoe: As you gear up for your Fantasy Football playoffs, reliability is imperative. Check out this week’s Most Reliable Players… 1 month ago
  • RT @Verizon: 🎉🎊🏆 Verizon Small Business Digital Ready just won GOLD for “Best New Service” at this year’s North American Best in Biz Awards… 1 month ago
  • RT @ScottHanson: Reliability is a top priority for your fantasy lineup, so be sure to check out the Most Reliable Players list this week, p… 1 month ago
Follow @katrinacabrera

Blogroll

  • David Lebovitz
  • Gringo in Buenos Aires
  • Homesick Texan
  • Kelly Poindexter – Pastelera
  • La Panza Porteña
  • My Beautiful Air
  • NOLAchef
  • Pick Up the Fork
  • San Telmo Loft
  • Smitten Kitchen

On Bloglovin’? Follow Me Here!

Follow on Bloglovin

Blog at WordPress.com.

  • Follow Following
    • One Day Café
    • Join 118 other followers
    • Already have a WordPress.com account? Log in now.
    • One Day Café
    • Customize
    • Follow Following
    • Sign up
    • Log in
    • Report this content
    • View site in Reader
    • Manage subscriptions
    • Collapse this bar
 

Loading Comments...