• About
  • Contact
  • Orders / Pedidos
  • Press

One Day Café

~ good eats from a small kitchen

One Day Café

Category Archives: entrees

Recipe: Spicy Thai Noodles with Plums & Bok Choy

05 Monday Aug 2013

Posted by Anonymous in entrees, recipes

≈ Comments Off on Recipe: Spicy Thai Noodles with Plums & Bok Choy

Tags

bok choy, chicken, dinner, food, healthy, nectarines, noodles, pasta, plums, recipe, salad, spicy, stone fruit, Thai

Thai Noodles with Plums & Bok Choy

Mmm, such a tasty summer entree. This recipe has survived dinner parties from Chicago to Buenos Aires, and every time I make it, it’s a bit different based on what’s in-season and what ingredients I have access to. In Buenos Aires, the wide variety of ethnic food products we’re accustomed to in the United States was immensely narrowed down, but with a little creativity (and a heavy hand with the not-spicy spices) I made it work.

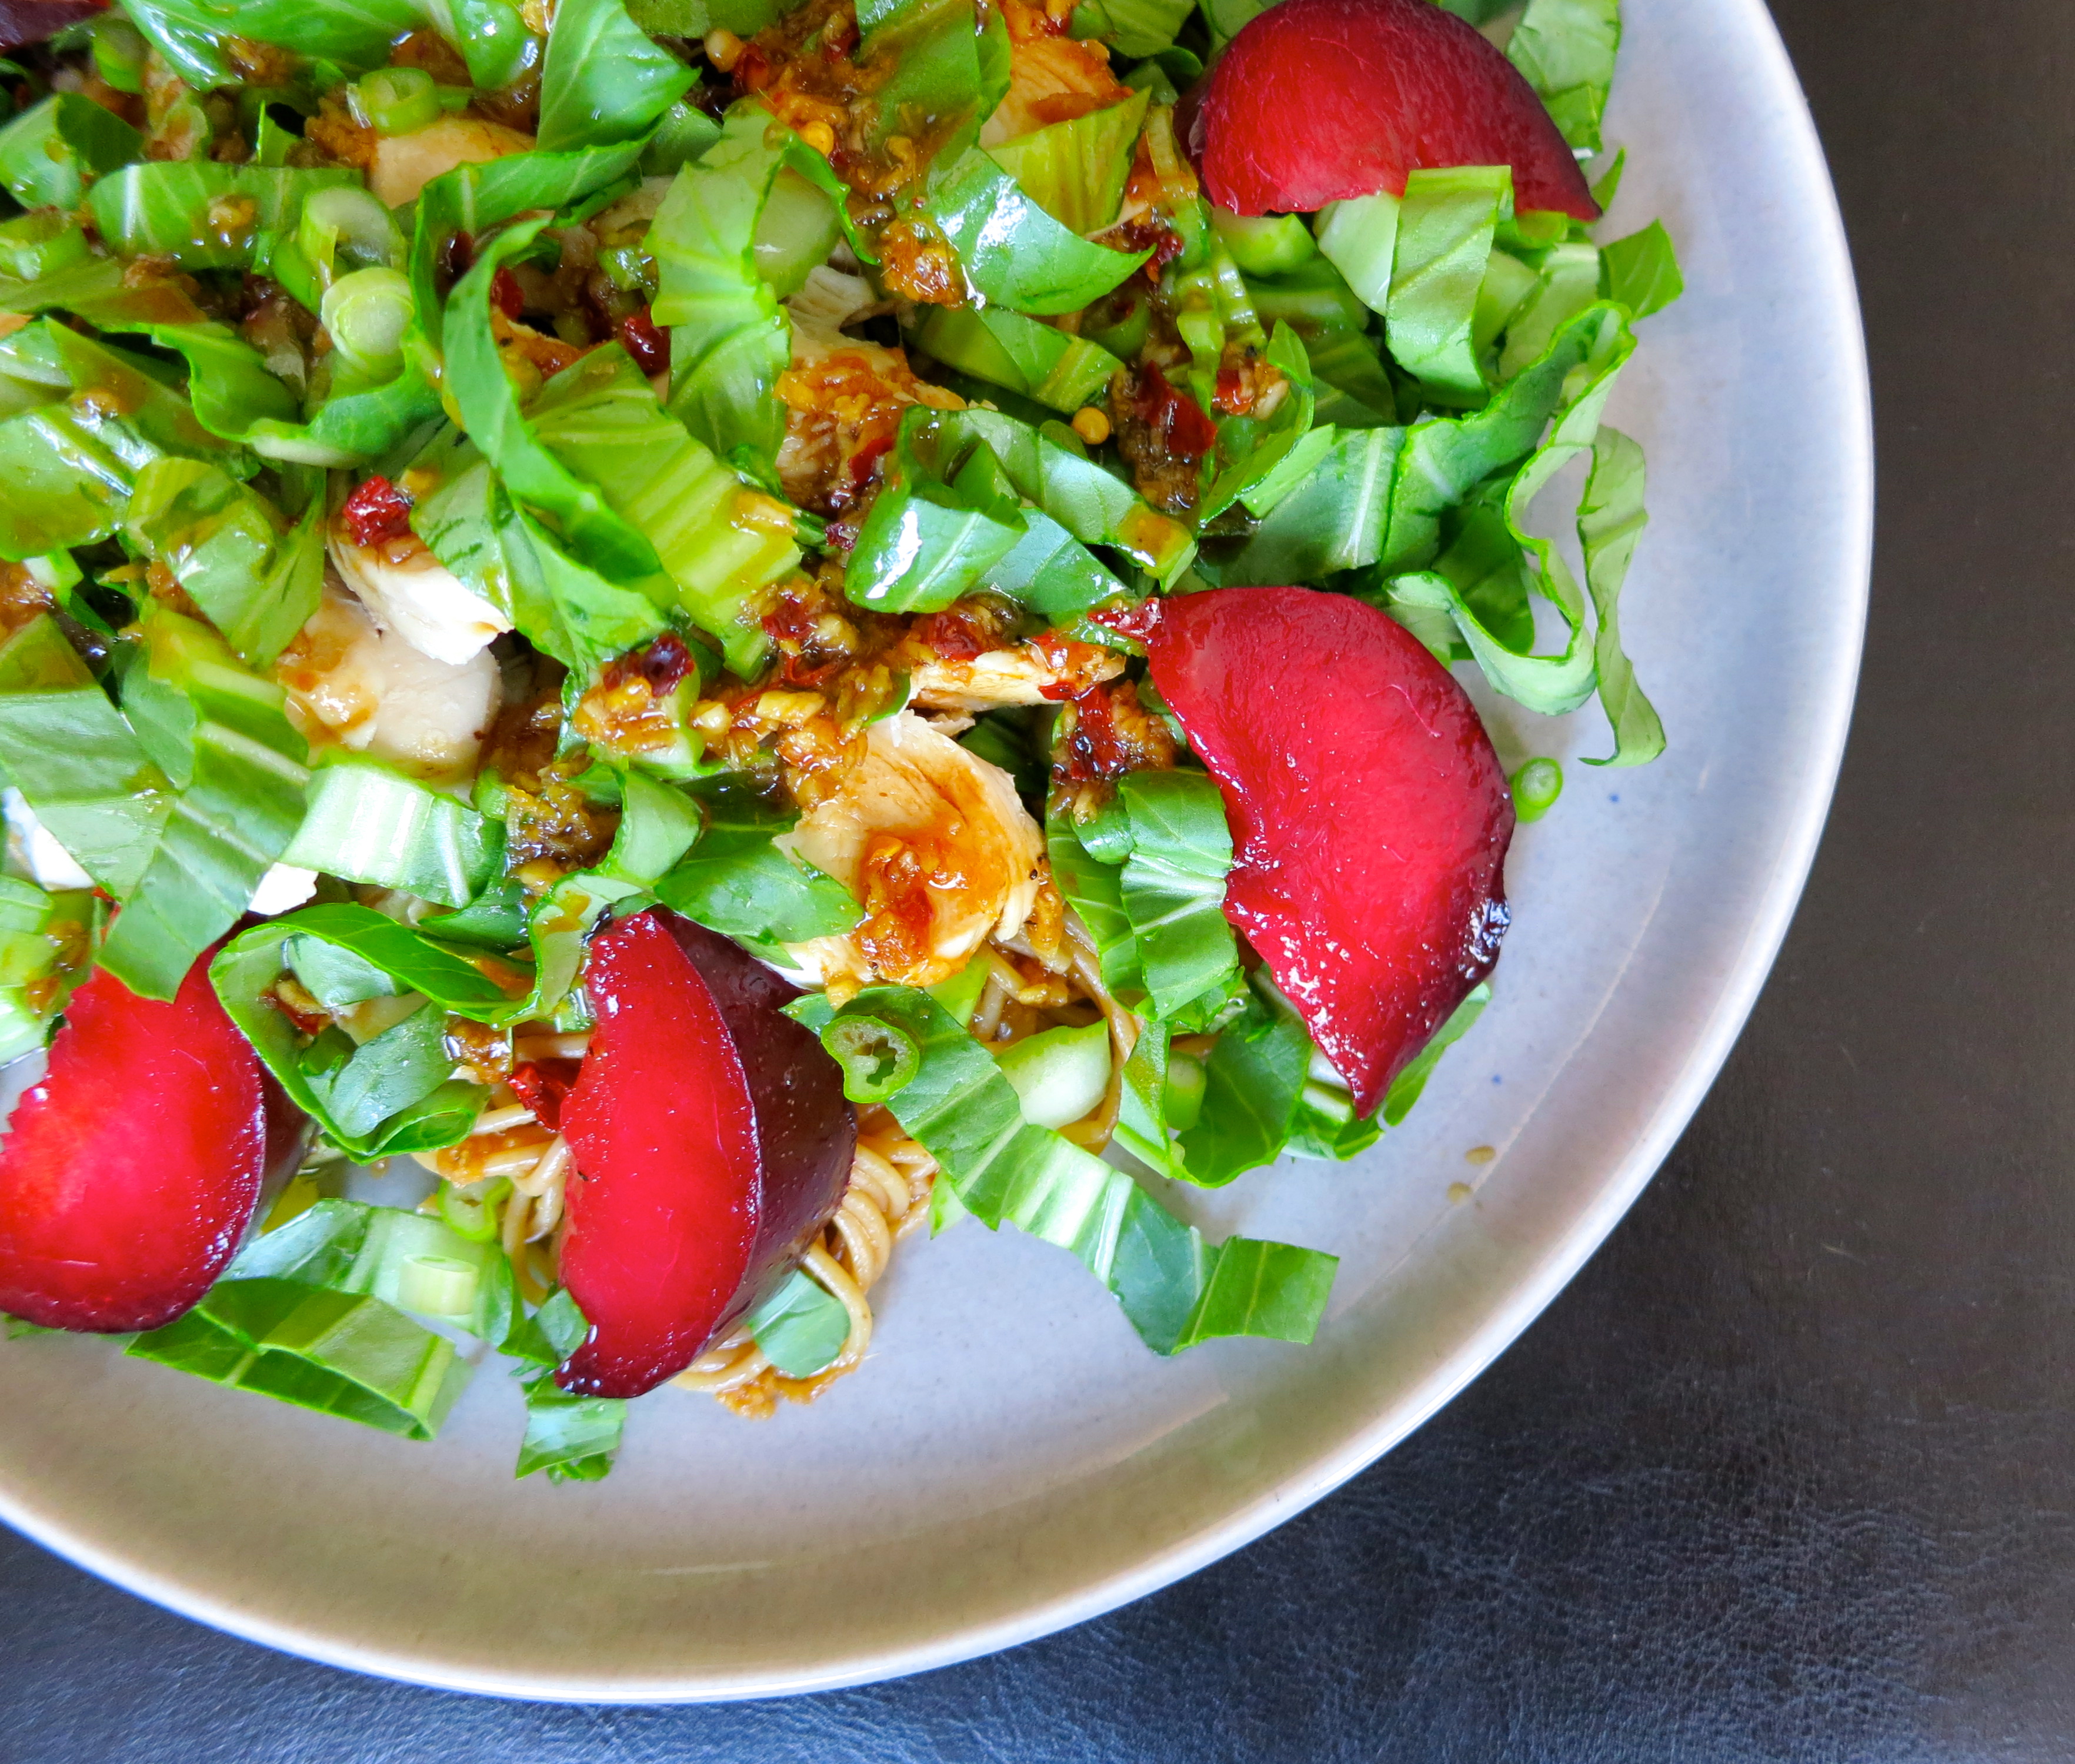
The flavors and textures in this dish are unexpected and fresh. It’s a combination of juicy stone fruit, slightly bitter bok choy and slurp-worthy noodles tossed in a peppery-sweet sauce with a spicy kick. If spicy’s not your thing, omit the cayenne pepper and go easy on the crushed red pepper. I tend to use whole grain angel hair or soba noodles, but ramen or rice noodles would work well, too. And I grab whatever stone fruit looks most appealing. Nectarines work really well, but these plums were too pretty to pass up.

This is another oldie but a goodie adapted from Better Homes & Gardens.

Thai Noodles Closeup

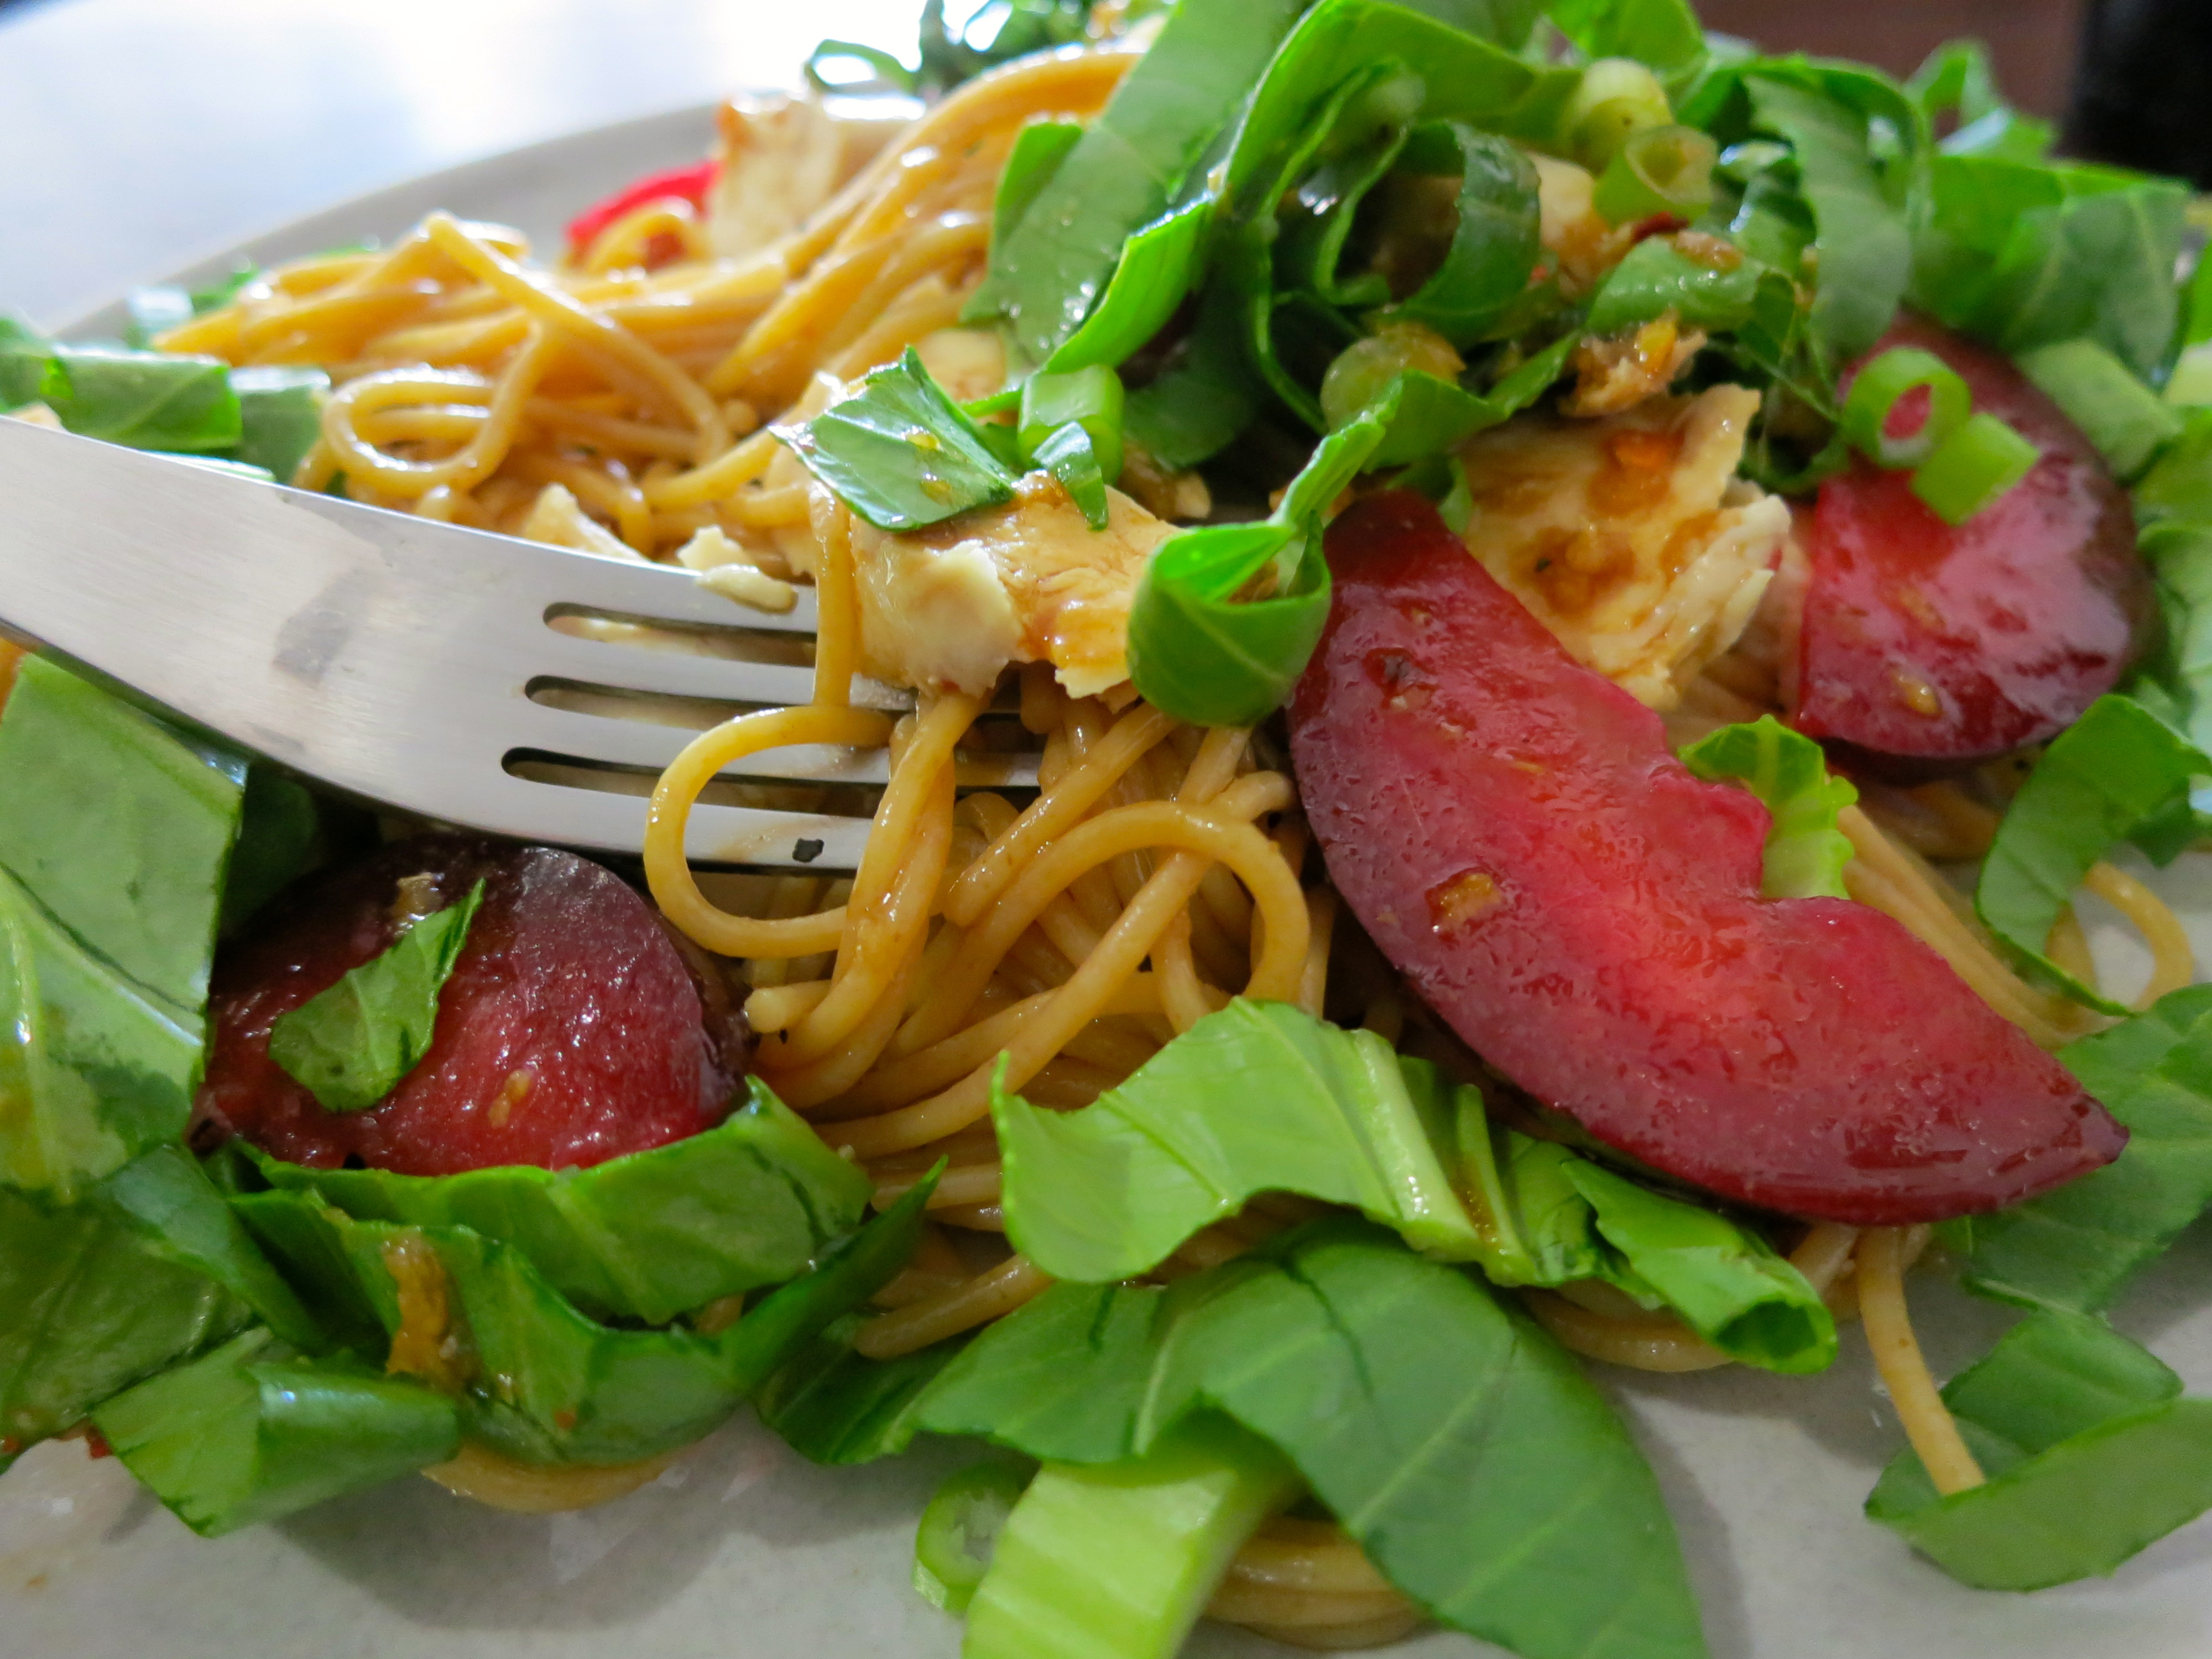
SPICY THAI NOODLES WITH PLUMS & BOK CHOY

1 lb. chicken tenderloins

4 ounces of noodles

1/4 cup chicken stock

3 Tablespoons low-sodium soy sauce

2 Tablespoons hoison sauce

1 Tablespoon sugar

1 Tablespoon olive oil

2 teaspoons toasted sesame oil

3 cloves garlic, minced

1 1/2 teaspoons grated fresh ginger

1 teaspoon crushed red pepper

1/2 teaspoon cayenne pepper

1/8 teaspoon ground black pepper

3 nectarines and/or plums, sliced

one bunch of bok choy

1 green onion, thinly sliced

Cook the tenderloins in a small amount of boiling water in a large skillet, covered, for 12 to 15 minutes or until no longer pink. Drain and cool slightly, then slice against the grain. Cook noodles according to package directions. While the pasta’s cooking, whisk together the chicken stock, soy sauce, hoison sauce, sugar, olive oil, sesame oil, ginger, crushed red pepper, cayenne pepper and black pepper in a small bowl. Drain the cooked pasta, rinse in cool water and toss it with about 3/4 of the dressing. Divide the pasta up on your serving plates, and top with chicken, fruit, bok choy and green onions. Drizzle with the remaining dressing.

Campfire Cooking: Hobo Pies

12 Tuesday Feb 2013

Posted by Anonymous in argentina, breakfast and brunch, chile, desserts, entrees, recipes, travel

≈ 2 Comments

Tags

Argentina, campfire, Camping, camping food, chile, food, hobo pies, mountain pies, sandwiches, the beach, travel

Why is this road so empty?

The wide open road heading into Paso San Francisco.

We made our way through northern Argentina more quickly than expected. Since we’ve had the opportunity to explore Salta, Tucumán, and Mendoza on previous trips, we basically made a beeline from Brazil to the Chilean coast. We crossed into Chile via the little used Paso de San Francisco, which included more than 100 kilometers of unpaved, extremely bumpy and winding roads through the Andes…an adventure that explains why we had the road virtually to ourselves.

Emerging from Paso San Francisco into the Atacama Desert in Chile

Emerging from Paso San Francisco into the Atacama Desert in Chile

Now we’re slowly working our way up the coast of Chile, where many of the beaches are wide open for public use, fishing, and camping. Having the opportunity to pitch a tent on a peaceful beach with the waves breaking and the sky overflowing with brilliant stars is extra special. And after subsisting on a diet of yogurt, crackers, canned tuna and mouthfuls of desert dust for a few days on the road, we were ready for some tasty camp food.

Playa Cifuncho Camping

I was first introduced to hobo pies by my high school BFF during a camping trip in Assateague Island, Maryland – another spot I highly recommend for some quality beach camping. When she whipped out her hobo pie maker, I admit that I did not believe the hype. It’s basically a square, sandwich-sized pie iron and I prepared myself for the equivalent of grilled cheese. But after devouring deliciously crispy mini pepperoni pizzas pockets and polishing off a S’mores sammie oozing melted chocolate and marshmallows, I was thoroughly convinced that I needed a hobo pie maker, stat. (Thanks Suzie! I should have never doubted you).

Hobo Pies

There’s really no recipe needed for a delicious hobo pie and experimenting is half the fun. The basic requirements are the pie iron (which you can purchase at camping/outdoor stores or online), some non-stick cooking spray, sliced bread, and of course, a campfire. Just grease the pie iron with the cooking spray, make your sandwich with your ingredients of choice, lock it up and stick it in the fire. Cooking time varies depending on the strength of your fire, but I generally check within a minute or so in case I want to adjust the positioning to reduce the potential for burnt toast. Simple, right? And something about cooking on a campfire just makes everything taste better.

With the limited ingredient options that come with traveling through South America, we’ve played it somewhat safe thus far. Toasted ham and cheese with a slice of tomato is a good bet for a quick and easy breakfast or lunch. For dinner, turkey, cheese and tomato sauce with some freshly ground black pepper hits the spot.  But I dream of making delicious Reuben Hobo Pies, or pies stuffed with brie and strawberries, or maybe some peanut butter banana chocolate goodness….but that will have to wait til we’re back in the homeland.

Recipe: Polenta & Spinach Soup

11 Friday Jan 2013

Posted by Anonymous in appetizers and sides, entrees, recipes

≈ 1 Comment

Tags

comfort food, dinner, easy dinner, food, polenta, soup, spinach, vegetarian

Spinach & Polenta Soup

I admit, it may be a bit odd to make thick, hot soup when it’s pushing 90 degrees outside. But I’m on a mission to use up all of our food stuffs in the next week, including a half kilo of polenta. So, sorry husband! Sit in front of the fan and eat it.

Polenta is a ground cornmeal that has a smooth, creamy texture when cooked. It originated in Italy, so I suppose it’s no surprise that it’s so popular in Buenos Aires. According to Wikipedia it’s known as a “peasant food”, which seems kind of rude, right? But considering I’ve made at least five meals out of this one-kilo bag with no end in sight, I suppose I can see the correlation.

I actually purchased the polenta just to try this recipe out in the first place. It was so good that rather than expanding my polenta-cooking repertoire I just made it again…and again, and again. It’s cheap, super flavorful, and takes about 30 minutes to whip together. Well, 45 if you have to carefully clean each leaf of spinach, like I do.

The original recipe was from Bon Appétit. I’ve altered it to suit my preferences.

POLENTA & SPINACH SOUP

  • 6 cups (or more) of chicken broth
  • 3/4 cup polenta
  • 3 tablespoons flour
  • 3 tablespoons butter
  • 4 garlic cloves, minced
  • Coarse kosher salt
  • 8 ounces baby spinach leaves
  • Fresh shredded parmesan or sharp cheddar cheese

Bring 6 cups of broth to a simmer in a sauce pan; cover to keep warm. Whisk polenta and flour in heavy large pot. Add 1 cup hot broth; whisk over medium-high heat until smooth. Stir in butter and garlic; sprinkle lightly with coarse salt. Gradually add 5 cups hot broth by cupfuls. Boil gently over medium heat until polenta is tender and soup is creamy and thickened, whisking frequently and adding more broth to thin, if desired, about 15 to 25 minutes depending on the strength of your stovetop. Stir in spinach by handfuls; simmer until wilted, stirring often, 5 minutes longer. Season with more coarse salt and black pepper. Spoon into bowls and top with shredded cheese.

Christmas Feast-Worthy Roast Duck

24 Monday Dec 2012

Posted by Anonymous in entrees, recipes

≈ Comments Off on Christmas Feast-Worthy Roast Duck

Tags

christmas feast, dinner, duck fat, holiday dinner, poultry, roast duck

Simple Roast Duck

Growing up, Christmas always meant amazing home-cooked food. From the early morning breakfast (Magic Marshmallow Crescent Puffs, FTW!) all the way to the array of post-dinner cookies, it was day of continuous culinary delights. I still feel the same way today. Christmas is just not the same for me without a delicious home-cooked spread.

Ham was the tradition when I was a kid. In recent years, I dabbled in turkey. This year, I’m thinking duck.

Until recently, I’d only ever had duck at restaurants, hearing that it’s difficult to prepare at home. I was misinformed. To be sure, you can make it as complicated as you like, but a simple roast duck is delicious without all that craziness involving hair dryers and boiling pots of water. There may be an extra step or two involved, but when you carve into that melt-in-your-mouth bird, you will feel it’s well worth it.

Carving Duck

I followed a video recipe from the New York Times. It was low-maintenance, and the outcome was crispy, flavorful and Christmas feast-worthy for sure.

SIMPLEST ROAST DUCK (original recipe from the New York Times)

4 – 6 pound duck

1 Tablespoon kosher salt 

Aromatics of your choice: orange zest, toasted coriander, ground pepper, rosemary, garlic, onions, shallots, etc.

Fingerling potatoes, for an easy side dish

24 to 48 hours before you plan to serve the duck, trim off excess fat and skin around neck and tail areas. (This can be saved to render duck fat later). With a paring knife, prick the duck skin all over, sliding the knife between the skin and the flesh. This will release the fat so it will render while the duck roasts, making the skin nice and crispy. You don’t want to directly prick the flesh, as that will dry it out.

Season the duck, inside and out, with kosher salt and whatever aromatics you’d like to use. I used chopped fresh rosemary, garlic, and ground pepper. Put the duck in the fridge, uncovered, so that the skin can dry out a bit for the next 24 – 48 hours.

When you’re ready to roast the duck, preheat the oven to 450° F. Add more seasonings to the cavity. I used crushed garlic, sprigs of rosemary, and onion slices. Place in roasting pan, breast side down. If desired, toss the fingerling potatoes in the pan along the sides, to cook in the duck fat. Roast for 30 minutes. Lower oven temperature to 350° F, and roast for another 30 minutes. Flip the duck over in the roasting pan, so that it’s breast-side up. If desired, use a turkey baster to suction up some of the fat in the bottom of the pan, to prevent it from smoking. Put the duck back in the oven for another 1 – 2 hours.

To check for done-ness, you can wiggle the legs of the duck. They should feel loose. A meat thermometer inserted into the thickest part of the thigh should register at least 175° F.

Roast DuckWhatever you decide to serve for your holiday feast this year, we hope you enjoy! Felices Fiestas!

Recipe: Caprese Frittata with Jamón Crudo

14 Friday Dec 2012

Posted by Anonymous in breakfast and brunch, entrees, recipes

≈ Comments Off on Recipe: Caprese Frittata with Jamón Crudo

Tags

baked eggs, breakfast, breakfast and brunch, breakfast for dinner, brunch recipe, caprese, cheese, eggs, frittata, mozzarella, tomato, tomato basil

Slice of Caprese Frittata with Jamón Crudo

Yep. More eggs, people. I warned you we eat them a lot!

While I’m sure this would make a lovely breakfast or brunch recipe, we’ve only ever eaten it for dinner. And to be honest, that’s usually because I’ve taken stock of what’s nearing the end of its lifespan in the fridge and realized we need to use up some eggs. But it’s hearty enough to make a filling (and quick) dinner, and it’s super tasty.

This is another recipe that lends itself to substitution. Whether you just happen to have red pepper or onion on hand, an overabundance of chives in the garden, or you bought an economy-sized bag of oregano that isn’t going to make the cut as you pack to leave the country (ahem), anything goes. Just do not skip those chunks of mozzarella cheese. DO NOT! Nor should you try to be lazy about it by adding grated mozzarella instead. Buy a block and cut up those chunks, you’ll thank me for it later when you’re savoring the soft gooey deliciousness of a pocket of melted cheese.

Frittata Closeup

CAPRESE FRITTATA WITH JAMÓN CRUDO

10 large eggs
1/4 cup milk
1/4 cup freshly grated Parmigiano-Reggiano cheese
1/4 cup chopped basil
3/4 teaspoon salt
1/2 teaspoon freshly ground pepper
2 tablespoons olive oil
2 shallots, thinly sliced
1 tomato, diced
4 thin slices jamón crudo, bondiola, or prosciutto, chopped
6 ounces mozzarella, cubed

Preheat the oven to 350°F. In a bowl, beat the eggs with the milk, Parmigiano, basil, salt and pepper. In an ovenproof nonstick skillet, heat the oil. Add the shallots and cook over low-moderate heat until softened. Stir in the tomato and prosciutto until warm. Add the eggs. Cook without stirring until the eggs are beginning to set on the bottom, about 3 minutes. Poke the mozzarella into the eggs. Bake the frittata until just set, about 20 minutes. Shake the skillet over a burner on high heat until the frittata releases, 10 seconds. Invert the frittata onto a plate and let cool for 5 minutes, then cut into wedges and serve.

Recipe: Carnitas

05 Wednesday Dec 2012

Posted by Anonymous in entrees, recipes

≈ 4 Comments

Tags

carnitas, david lebovitz, dinner party, easy dinner, feeding a crowd, mexican food, pork, slow roasted pork

Carnitas

I was introduced to the glory of carnitas years ago, when friends in Chicago invited us over for “Carnitas Night” and we stuffed ourselves with guacamole, black bean dip, tres leches, margaritas and the star of the show:  tender, flavorful slow-roasted pork. I was hooked. (Thanks, Amy and Matt!)

But with so many recipes and preparation recommendations floating around, it took me a while to perfect my favorite version of the dish. After lots of searching and taste testing, David Lebovitz’s carnitas recipe stood head and shoulders above the rest. This version is adapted from his, with the spice factor kicked up a notch and as always, heavier on the garlic.

Carnitas2

What I love about carnitas is its simplicity. The intensity of the flavor belies the fact that it’s so easy to prepare. And it feeds a crowd, just add some plantain chips and guacamole to round out the party. I like to serve the meat with corn tortillas and a simple avocado pico de gallo, but feel free to add whatever toppings you like: shredded cheese or queso fresco, sour cream, hot sauce, etc.

Carnitas3

CARNITAS (adapted from recipe by David Lebovitz)

4-5-pounds boneless pork shoulder (bondiola) or pork butt, cut into 5-inch chunks and trimmed of excess fat
1 tablespoon coarse sea salt
1 tablespoon canola or neutral vegetable oil
water
1 cinnamon stick
1 Tablespoon chile powder
dried hot peppers, to taste
2 bay leaves
¼ teaspoon ground cumin
5 cloves of garlic, peeled and thinly-sliced

Rub the pieces of pork shoulder all over with salt. Refrigerate overnight. (You can skip this step if you want. Just be sure to salt the pork before searing the meat.) Heat the oil in a roasting pan or oven-safe pot set on the stovetop. I use my Le Creuset French oven. Cook the pieces of pork in a single layer until very well-browned, turning them as little as possible so they get nice and dark before flipping them around.

Once all the pork is browned, remove it from the pot and blot away any excess fat with a paper towel, then pour in about a cup of water, scraping the bottom of the pan with a flat-edged utensil to release all the tasty brown bits.

Heat the oven to 350F (180C) degrees. Add the pork back to the pan and add enough water so the pork pieces are 2/3rd’s submerged in liquid. Add the cinnamon stick and stir in the chile powder, dried chilies, bay leaves, cumin and garlic.

Braise in the oven uncovered for 3½ hours, turning the pork a few times during cooking, until much of the liquid is evaporated and the pork is falling apart. Remove the pan from the oven and lift the pork pieces out of the liquid and set them on a platter. Once the pork pieces are cool enough to handle, shred them into bite-sized pieces, about 2-inches (7 cm), discarding any obvious big chunks of fat if you wish (but I love them, mmmm). Return the pork pieces back to the roasting pan and cook in the oven, turning occasionally, until the liquid has evaporated and the pork is crispy and caramelized. It will depend on how much liquid the pork gave off, and how crackly you want them.

Cheeseburger Pie a.k.a. Chewed Up Cheeseburger

15 Thursday Nov 2012

Posted by Anonymous in entrees, recipes

≈ 5 Comments

Tags

casserole, cheeseburger pie, chewed up cheeseburger, easy dinner, hurricane preparedness

As we prepared to hunker down in New Jersey in anticipation of Hurricane Sandy, we made a quick Target run for all the necessities before the stores closed indefinitely. I’m pretty sure our idea of “necessities” didn’t really jive with everyone else at Target, but hey, we didn’t know if this would be our last chance to stock up before heading back to Argentina! As we were filling our cart with things like basic tees, Mr. Clean Magic Erasers, and beauty products, it occurred to us that getting some food might be a good idea as well. What would make good hurricane comfort food? At Gaspar’s request, Chewed Up Cheeseburger it was.

The first time I made this I was in grade school. The recipe, called Quick Cheeseburger Pie, was from a cookbook that we’d gotten from Gold Medal Flour that was geared towards kids and had a different recipe for each letter of the alphabet. I’d already successfully tried my hand at a few other recipes in that little book, and my cousins were coming over for dinner so I wanted to pick a winner. I did, although it was my first lesson in portion planning as it wasn’t nearly enough to feed the crowd. Still, it went over like gangbusters and has been a go-to ever since, as many of our friends can attest. It was Gaspar who dubbed it Chewed Up Cheeseburger, which I initially found horrifying but have come to embrace. Perhaps it doesn’t sound all that appetizing, but think about all the delicious flavors of a cheeseburger in a flaky pie crust, and you may change your mind.

Like all casseroles, the photos may not be all that pretty, but just trust me.

CHEWED UP CHEESEBURGER

For pastry:

1 1/3 cup flour

1/2 tsp. salt

1/2 cup shortening

4 T. cold water

For filling:

1 pound lean ground beef

1 small onion, chopped

2 cloves garlic, minced

1/2 tsp. salt

1/4 cup flour

1/3 cup dill pickle juice

1/3 cup milk

1/2 cup chopped dill pickles

2 cups shredded cheddar cheese

Preheat oven to 425° F. For the pastry crust, in a medium bowl, mix 1 1/3 cups flour and 1/2 teaspoon salt. Cut in shortening until mixture resembles tiny peas. Add cold water 1 tablespoon at a time, stirring with a fork after each addition. Mix lightly, just until pastry almost cleans sides of bowl. Press into bottom and sides of an 8 inch pie pan. Bake in preheated oven for 15 minutes.

To make the filling, crumble ground beef into a large skillet and saute over medium heat for 1 minute. Add onion and garlic. Continue to saute until onion is browned, about 10 minutes. Drain grease from mixture. Sprinkle with 1/2 teaspoon salt and 1/4 cup flour. Stir in pickle liquid, milk, pickles, and 1 cup shredded cheese. Spoon mixture into pastry shell. Bake in preheated oven for 15 minutes. Sprinkle top with remaining 1 cup cheese and bake an additional 5 minutes, until pastry is golden brown and cheese is bubbly.

Recipe: Paella Mixta

02 Tuesday Oct 2012

Posted by Anonymous in entrees, recipes

≈ 4 Comments

Tags

chicken, chorizo, Madrid, paella, seafood, Spanish food, tapas, Valencia

For the longest time, to me, Spanish food meant tapas and tapas only. Baked goat cheese in tomato sauce, calamari a la plancha, sautéed mushrooms, pinxtos…what’s not to love? I’d always been so firmly focused on the small plates, I never bothered exploring the array of more filling options. And after staring down the beady-eyed shrimp topping my first paella during a trip to Madrid, I wasn’t quite sure that I was up for the challenge.

But once I got past my fear of picking apart the little creatures, I was on a mission to learn to make paella at home. It just seemed a little overwhelming, what with hunting down the special pan, special rice, special who the hell knew what else. So being the thoughtful man he is, upon our return to Chicago Gaspar made us reservations at Café Ba-Ba-Reeba’s paella cooking demo. Of course, I suspect he was thinking about how he could benefit from me learning to make paella, as much as he was thinking about making me a happy lady. For anyone living in the area, I wholeheartedly recommend signing up for the class. It’s reasonably priced, includes lunch and vino, and they sell super convenient paella kits. For the rest of you, check out La Tienda for kits or individual ingredients.

Once you gather the key items, you will get plenty of use out of them. Trust me. The first must is a paella pan. The pans are shallow and have sloping sides, which helps the rice cook evenly and develop a more intense flavor. In addition to the proper pan, it’s important to use high-quality paella rice. Calasparra or Bomba rice is the best. These are classic short grain varieties grown in Spain that are super absorbent, expand in width when cooked, and maintain their separate shape without becoming creamy or sticky. Then there’s the saffron, which gives the paella its rich yellow color and an additional depth of flavor. I also consider the sweet smoky Spanish paprika a must.

Beyond these key ingredients, I tend to mix it up, and you should too. Chicken, monkfish, rabbit, chorizo, shrimp, mussels, peas, red peppers…whatever strikes your fancy.

Real, Valencian paella is almost always cooked over an open fire, which helps it develop the delicious socarrat, a caramelized crust of rice. I’m not really in the proper situation to be cooking over open flames, so my methods are modified accordingly and sadly, that means no socarrat. But if you have the time, patience and equipment for it, you can cook the paella either over an open flame or completely on the stovetop, rotating it often. Whichever way you choose, tranqui, it’ll still be delicious.

This version is adapted from the recipe for Arroz el Principe in Paella Cookbook from Café Ba-Ba-Reeba.

PAELLA MIXTA

4 Tablespoons olive oil

1/2 pound (approx. 1/4 kilo) dark meat chicken, diced

Seafood of choice (I recommend 15 raw shrimp or 1/2 pound shelled mussels)

1/4 pound hard Spanish-style chorizo sausage, diced

2 tsp. garlic, minced

1 tsp. sweet pimentón (paprika)

3 ounces tomato puree

1 can peas

1 1/4 cup Calasparra or Bomba rice

3 threads saffron

4 cups chicken stock

salt, to taste

Before you start, I recommend prepping all the ingredients. The cooking process goes pretty quickly, so it’s best to have everything on hand.

Heat the olive oil in your paella pan over medium heat, and sauté the chicken until golden brown. Add the garlic, sweet pimentón, tomato puree, peas and chorizo. Then add the rice, stirring so that the grains are thoroughly coated with the oil mixture. Finally, add the saffron and chicken stock. Turn heat to low. Continue to cook until 1/4 of the liquid is reduced. Add the seafood, without stirring the rice (I just sort of tuck/dunk the seafood into the mixture, so as not to disturb the rice too much). Season with salt and bring to a boil. Place in the oven at 350° Fahrenheit for 15 – 20 minutes. Before serving, let it rest for a few minutes, covered with brown paper or foil, so that the rice absorbs the liquid completely and the outside edges crisp.

Recipe: Tully Chicken Casserole

27 Monday Aug 2012

Posted by Anonymous in entrees, recipes

≈ 10 Comments

Tags

chicken casserole, cream of chicken soup substitute, Rex gacetillas, Ritz crackers

Growing up in the country of western Pennsylvania exposes one to a lot of food traditions that you may not appreciate until you move away and find yourself at a grocery store deli counter struggling to explain what you mean by “chipped ham.” (Y’all are missing out, I tell you). Like many people, there are certain foods I will always associate with home. Some were common in the area, like pierogies, and sweet corn from Ambrose Farm Market. Others were specialties in the Limbaugh household, like black raspberry jelly, rhubarb crunch, and homegrown Limbaugh’s Legacy Potato-Top tomatoes. (Seriously. They’re really called that.)

This recipe falls into the latter category. I sometimes wish I could think of a name more descriptive than what we always called it: Tully Chicken. So named because my mom got the recipe from the Tullys, a family that attended our church. I have to wonder what the Tullys called it, and if they have any idea how famous their name’s become amongst a group of chicken casserole lovers.

With the chilly grey skies that have been enveloping Buenos Aires lately, comfort food’s been the name of the game and I was really craving some Tully Chicken. But even though this recipe is so simple, this city is missing two crucial casserole ingredients: cream of chicken soup and Ritz crackers. Or so I thought. As I strolled through the aisles of the newly-opened Carrefour in our neighborhood, I spotted a package of Rex galletitas. How had I never noticed these Ritz-look-alikes before? After a close inspection to confirm their validity, I swept a pile into my basket and rushed home to look up cream of chicken substitutes on the interwebs. Double score! Leave it to the Southerners to figure out how to make a casserole in a pinch.

While Mom always boiled a whole chicken to make Tully Chicken, I prefer to roast it. Mostly because that crispy skin can’t be used in the casserole, so it goes directly in my belly. But I also find the texture and flavor a bit more pleasing. The downside is that it may be tempting to skip the recipe entirely once your chicken comes out of the oven all golden and crispy-like.

Like most casseroles, it ain’t healthy. But isn’t that the point of comfort food?

TULLY CHICKEN CASSEROLE

One whole chicken, about 3 – 4 pounds

One can cream of chicken soup, or use this substitute

About 12 ounces of sour cream (more or less, to taste)

Two sleeves of Ritz crackers, or 4 bags of Rex crackers

Stick and a half of butter (about 170 grams)

Roast or boil the chicken and let it cool enough to pick the meat from the bones. (I like to use Thomas Keller’s simple roast chicken method). Combine sour cream and cream of chicken soup in a large bowl, and add the chicken. Stir until chicken is evenly coated. Spread the mixture in a 9 x 13 pan or casserole dish.

Melt butter in a medium-sized bowl and set aside. Place crackers in a large Ziploc bag and seal, letting out as much of the air as you can. Crush the crackers in the bag using a rolling pin. I like to leave some larger chunks of cracker – don’t go overboard or you’ll make a powder out of it. Combine the crushed crackers and melted butter, then spread the mixture on top of the chicken.

Bake at 375° F for about 20 minutes, until bubbly and slightly browned.

Recipe: Cilantro Chimichurri

30 Monday Jul 2012

Posted by Anonymous in appetizers and sides, buenos aires, entrees, recipes

≈ Comments Off on Recipe: Cilantro Chimichurri

Tags

asado, chimichurri, cilantro, grilling

Asado is a staple of Argentine culture and cooking. The word loosely translates to the English word barbecue; it can be an actual event or it can refer to the food. There’s no limit to the types and cuts of meat that can be piled on the parrilla for an asado.

Just like its North American brethren, no asado would be complete without condiments. The most common in Argentina would have to be chimichurri, a sauce typically made of chopped parsley, garlic, oregano, olive oil and vinegar. I’d had chimichurri before at Argentinian steakhouses in the USA and was never really bowled over. But then I tried the chimichurri at a hole-in-the-wall parrilla serving choripan in San Telmo. The greasy, murky jar with the little plastic spoon may not have been so visually appealing, but that ish was delish. I had to make some at home.

Because I love cilantro, this version includes it, and is also heavy on the garlic. It’s amazing how such simple ingredients can come together so deliciously.

Chimichurri can also be used as a marinade before grilling, and I’ve found this recipe complements steak, pork and chicken. It’s definitely best with grilled meats, but I’ve used it with braised meat as well and have even mixed it with cooked quinoa for a tasty side dish.

This recipe is adapted from one in Bon Appétit.

CILANTRO CHIMICHURRI

1/2 cup red wine vinegar

1 tsp. sea salt

5 garlic cloves, minced

1 shallot, finely chopped

1 red jalapeño, finely chopped

2 cups chopped fresh cilantro

1 cup chopped parsley

2 T. dried oregano (or 1/3 fresh, chopped)

1/2 cup olive oil

Combine vinegar, 1 tsp. salt, garlic, shallot and chile in a medium bowl and let stand for at least 10 minutes. Stir in cilantro, parsley, and oregano. Using a fork, whisk in oil. If using as a marinade, reserve at least a 1/2 cup of the chimichurri, sprinkle with salt to taste, and use later as a sauce. For the marinade, put meat in a glass, stainless steel or ceramic dish and toss with remaining chimichurri. Cover and chill for at least 3 hours or overnight before grilling.

← Older posts

Enter your email address to subscribe to this blog and receive notifications of new posts by email.

Join 2,479 other subscribers

One Day Cafe on Facebook

One Day Cafe on Facebook

algarrobo antofagasta appetizers and sides argentina brazil breakfast and brunch buenos aires chile desserts drinks ecuador entrees etiquette food trends france lima los órganos mendoza north carolina peru pittsburgh recipes restaurants san pedro de atacama tips & how to's travel Uncategorized uruguay

katrina’s twitter feed

  • RT @StephanieNOlson: Moms, please start adding the men to the group texts about teacher presents, extra-curricular kids stuff, birthday par… 1 month ago
  • RT @StephanieNOlson: We should celebrate women for getting a promotion, buying a house on their own. and raising funding the same way we ce… 1 month ago
  • RT @EliManning: Verizon is giving away Super Bowl tickets, and obviously I’d love to be your +1. Head to Verizon and enter for a chance to… 1 month ago
  • RT @rgay: We’re hanging with my niece while she does homework and ummm homework has changed since I was a kid fr. It’s so intense! Like wha… 2 months ago
  • RT @DrewBledsoe: As you gear up for your Fantasy Football playoffs, reliability is imperative. Check out this week’s Most Reliable Players… 3 months ago
Follow @katrinacabrera

Blogroll

  • David Lebovitz
  • Gringo in Buenos Aires
  • Homesick Texan
  • Kelly Poindexter – Pastelera
  • La Panza Porteña
  • My Beautiful Air
  • NOLAchef
  • Pick Up the Fork
  • San Telmo Loft
  • Smitten Kitchen

On Bloglovin’? Follow Me Here!

Follow on Bloglovin

Blog at WordPress.com.

  • Follow Following
    • One Day Café
    • Join 118 other followers
    • Already have a WordPress.com account? Log in now.
    • One Day Café
    • Customize
    • Follow Following
    • Sign up
    • Log in
    • Report this content
    • View site in Reader
    • Manage subscriptions
    • Collapse this bar
 

Loading Comments...